BOOTMARK Help Center

Your complete guide to running your business on BOOTMARK — and how it works for your clients.

What is BOOTMARK?

BOOTMARK is an all-in-one field-service management platform for service businesses — landscaping, HVAC, plumbing, electrical, cleaning, carpentry, and general contracting. It runs the whole operation in one place: clients, leads, quotes, jobs, scheduling and dispatch, crew tracking, invoicing, online payments, contracts and e-signatures, custom forms, inventory, fleet, reporting and automation. It also gives each business's own customers a self-service portal, and a public marketplace (BOOTMARK Connect) where homeowners and property managers can find a provider, request work, track the crew, sign documents and pay online.

How BOOTMARK works

How a service business runs its whole operation on BOOTMARK, from signup to reporting.

1

Sign up and go live

Create an account with email and password (or Google) and complete a short two-step registration: your company basics (name, business type, currency, address) and the service categories you offer. BOOTMARK gives you a unique web address and makes you the Owner. There is no approval queue — your workspace is live on the Free plan the moment you finish the wizard, and you land straight on your dashboard with a setup checklist.

2

Work the setup checklist

The checklist on your dashboard is the fastest path to a working system: add your first client, build your service catalog, invite a crew member, send an estimate. It saves its progress on your business record, so it follows you across devices and you can collapse or dismiss it once you are up and running.

3

Set up your workspace and team

White-label the app in App Customization with your logo, colors, theme, currency and tax, and turn feature areas on or off. Invite employees and crew from the Employees page (logins and temporary passwords are emailed), assign roles, and grant area-by-area permissions. Configure SMTP so mail leaves from your own address, and turn on two-factor authentication for the accounts that need it.

4

Build your catalog and inventory

Set up your Service Catalog — your price list and your public booking menu — marking each service Public or Private. Stock Materials and Products with prices and low-stock alerts, record Locations and Fleet (warehouses, vans, trucks), move stock with Stock Transfers, track tools with Equipment Checkout, and restock through Purchase Orders that top up inventory when received.

5

Capture and convert work

Leads arrive from your Connect listing, your booking page, client service requests, or are added directly to the Leads pipeline. Move a prospect from New to Won, convert a won lead into a client and an estimate, then turn an accepted estimate into an invoice, a work order or a contract in one click. Estimates can offer Good/Better/Best tiers so the customer chooses their own scope.

6

Schedule, dispatch and track

Drop jobs onto the calendar in day, week or month view, or switch to Crew View for one column per crew member. BOOTMARK warns you about double-bookings before you create them, and Optimize Route reorders a day of stops to cut driving. Crews work from Crew Mobile, clocking in and out against the job, uploading photos, capturing signatures and completing checklists — even offline, with the queue syncing when signal returns.

7

Get paid

Invoice from a completed job in one click, or bill a contract progressively as work completes with retainage held back. Take card payments online through Authorize.net, record cash, check and ACH manually, split deposits and partial payments, and issue refunds. Line-item and jurisdiction tax is calculated for you, and the optional dunning schedule chases overdue invoices on its own.

8

Paper the work

Send contracts for e-signature from a template or the clause library, with AI risk analysis flagging unusual terms before you send. Clients can request changes on the signing page before signing. Change Orders amend a signed contract with signed, priced amendments that flow into the contract value and the job cost.

9

Automate the routine

Automations are when-this-then-that rules across operations, finance and clients. Job Workflows define the stages a work order moves through for a particular kind of job. Recurring Jobs materialise scheduled work orders on a cadence. Reminders chase forms, contracts and invoices. The daily digest emails you a morning summary if you opt in.

10

Measure and improve

Business Reports cover sales, work orders, client activity, inventory, revenue trends and service distribution. Analytics adds trends and forecasts. Job costing rolls material, labour and change-order cost into a per-job margin. Bid win/loss records why you lost, CSAT captures how customers felt, and the Audit Log records who changed what.

11

Extend it

The Developer page issues scoped API keys and webhook subscriptions so BOOTMARK can talk to your other systems — accounting, a custom portal, a data warehouse or an automation tool. Every webhook delivery is signed and logged.

Browse by topic

Step-by-step guides

Getting started

Register your business and go live

1

Create the account

Sign up with email and password, or with Google. Verify your email address when prompted.

2

Step 1 — company basics

Enter your business name, business type, currency and address. The name becomes your workspace web address.

3

Step 2 — what you do

Pick the service categories you offer. These seed your catalog and, if you publish on Connect, decide which searches you appear in.

4

You are live

There is no approval queue. You are the Owner, your workspace is active on the Free plan, and you land on your dashboard.

5

Work the checklist

The setup checklist on the dashboard walks you through your first client, service, crew member and estimate. Progress is saved to your business record, so it follows you between devices.

Find your way around the dashboard

1

The sidebar

Every module lives in the left sidebar, grouped by Operations, Catalog, Finance, Team, Analytics and Settings. You only see what your role and plan allow.

2

Reorder it to suit you

Turn on customise mode to drag sections into your own order, hide the ones you never use, and star the pages you open daily.

3

The command palette

Press the palette shortcut to jump to any page or record by name instead of hunting through menus.

4

Cards that mean something

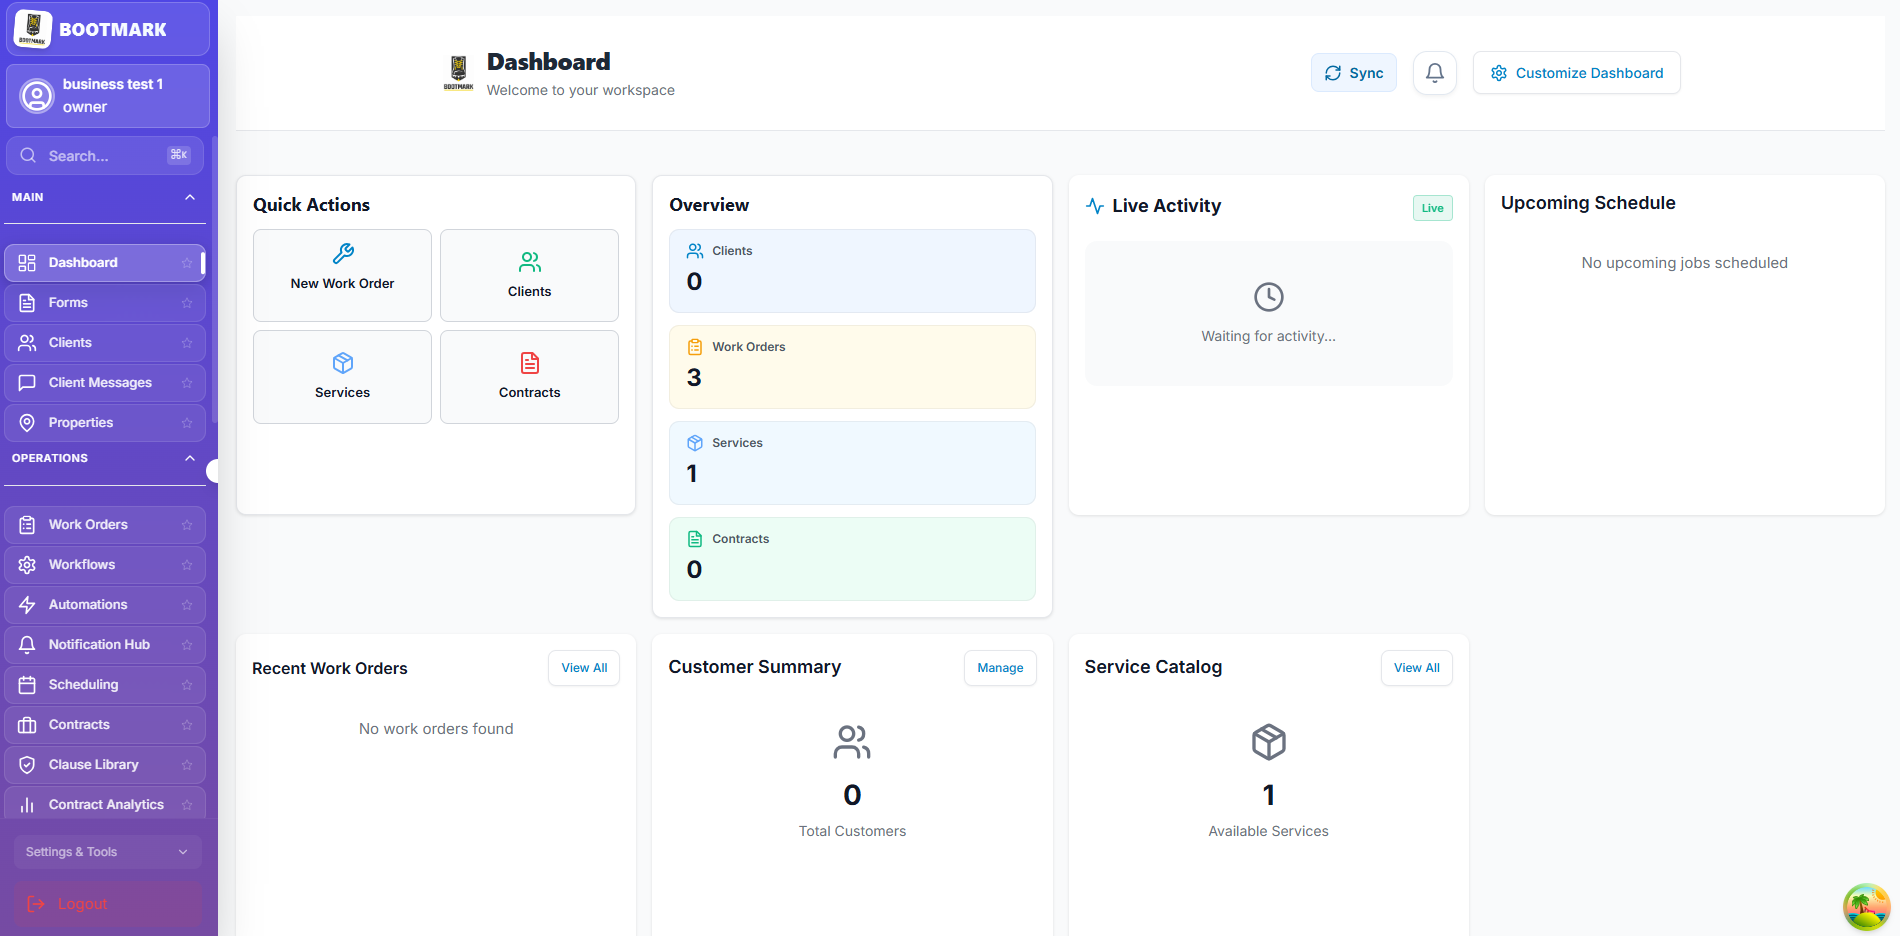
The dashboard leads with today's jobs, revenue and outstanding balances, plus alerts for anything that needs a decision.

5

Notifications

The bell collects everything addressed to you. Each notification deep-links to the exact record, correctly scoped to your workspace.

The dashboard: today's jobs, revenue and anything needing a decision

Install BOOTMARK as an app

1

Add to home screen

BOOTMARK is an installable progressive web app. On a phone, choose Add to Home Screen; on desktop, use the install control in the address bar.

2

Works offline

Crew screens keep working without signal. Actions queue on the device and sync automatically when the connection returns.

3

Push notifications

Allow notifications and job assignments and updates reach the phone even when the app is closed.

4

Stays current

The app updates itself in the background and tells you when a new version is ready.

Clients & the portal

Add clients and import your existing list

1

Add one by hand

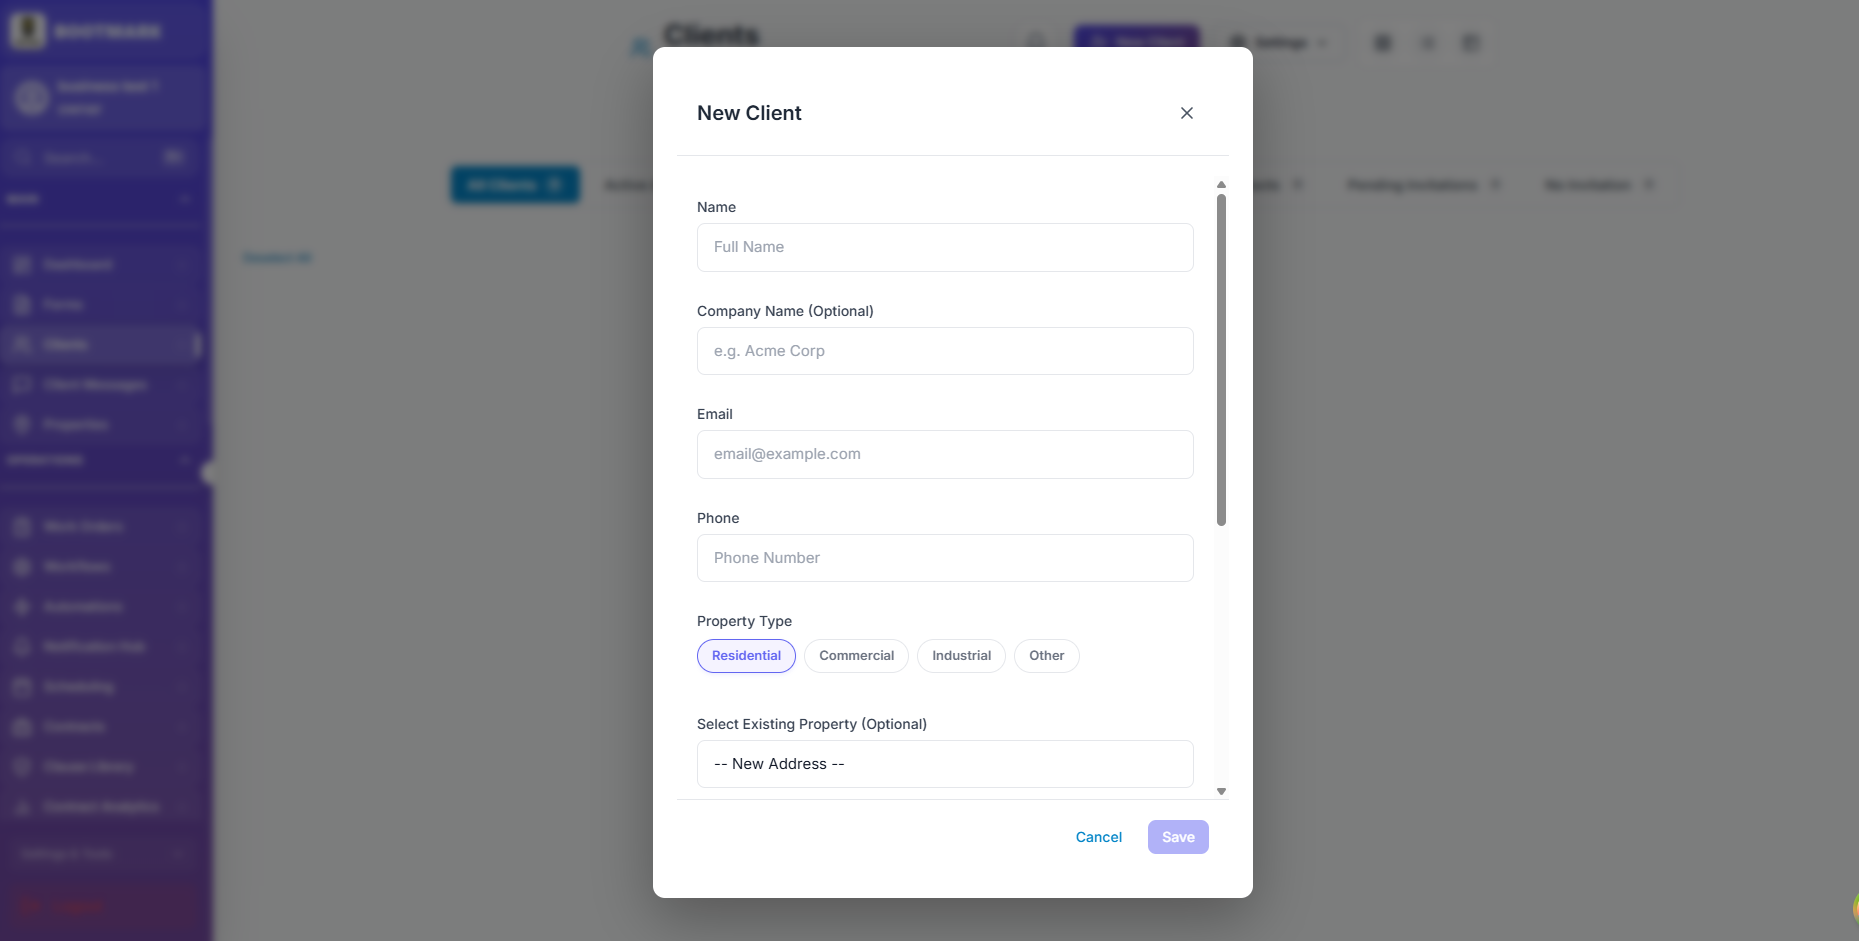
On Clients choose New Client. Only the name is required; add company, email, phone, address, tags and notes as you get them.

2

Import in bulk

Use the CSV import to bring an existing list across. Map your columns to BOOTMARK fields and review before committing.

3

Add their properties

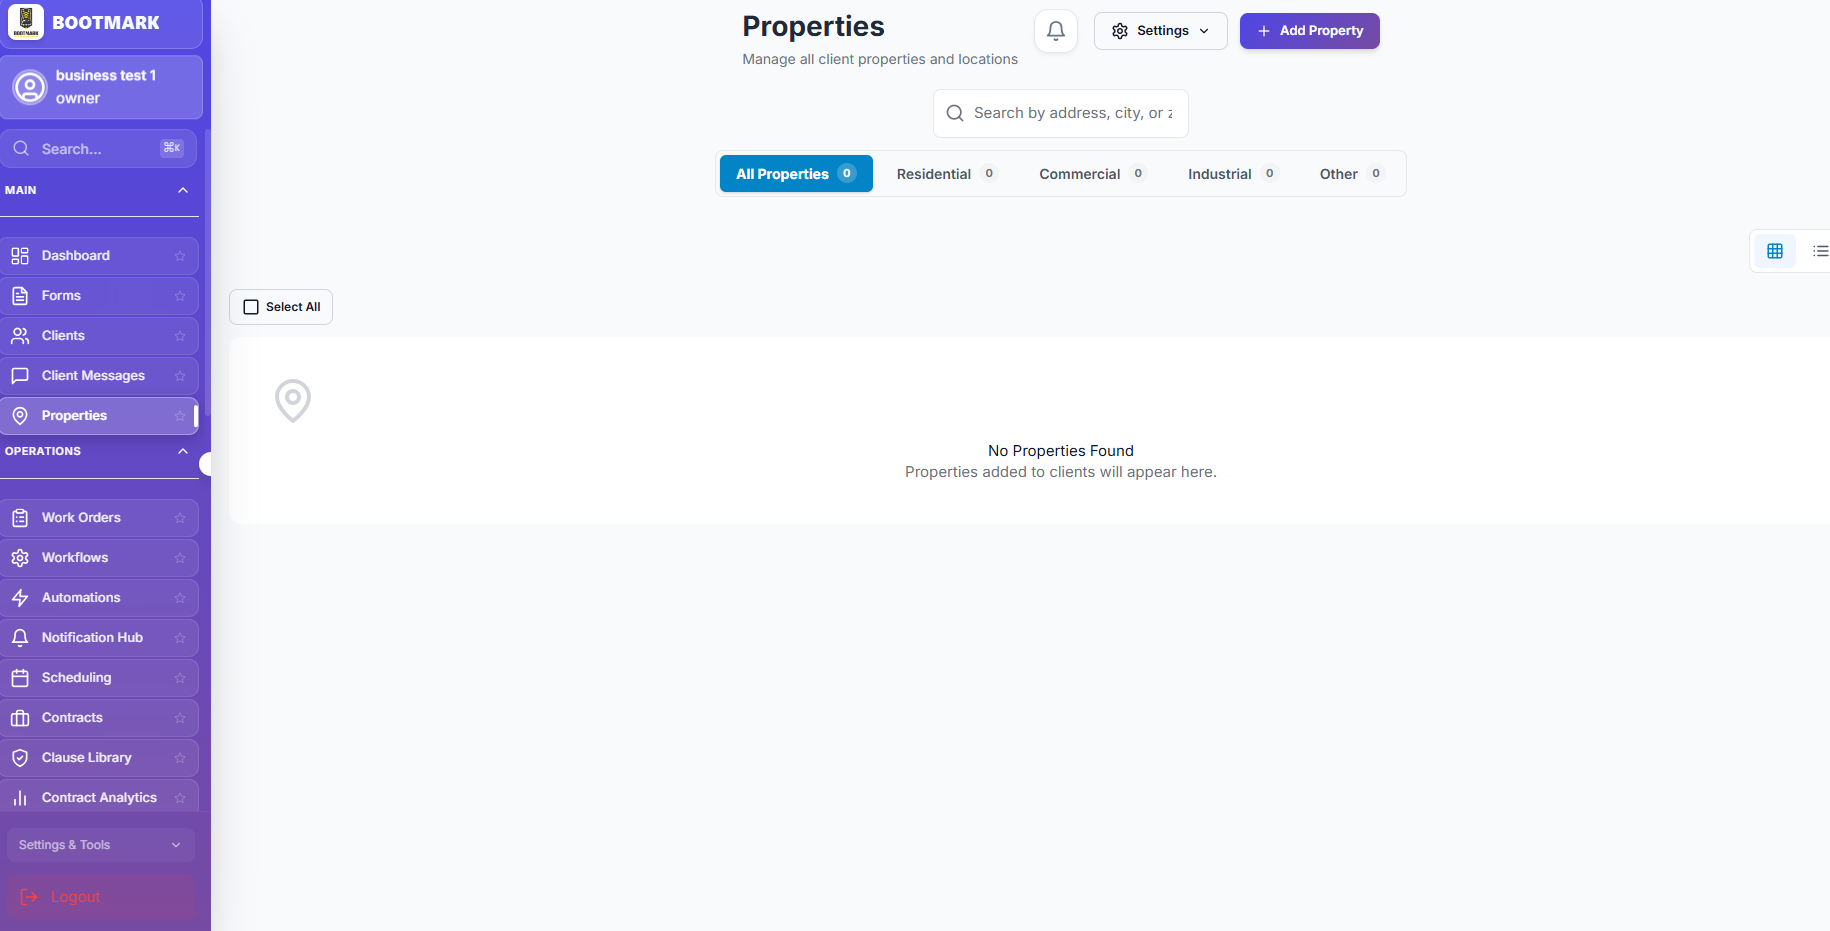
A client can have many service addresses. Properties keep site details, access notes and history separate from the billing contact.

4

See everything in one place

The client record shows their jobs, estimates, invoices, contracts, documents, messages and balance on one page.

Adding a client — only the name is required
A client's properties, each with its own access notes and history

Give a client portal access

1

Check the email

The client needs an email address on file — that is the invitation destination and their login.

2

Send the invitation

Use Send Invitation from the client list or the client record. They receive a link to set their own password.

3

What they can do

Signed-in clients see balances and activity, view and pay invoices, review and accept estimates, sign contracts, book services, raise requests, track a crew and message you.

4

Re-send or revoke

You can re-send an invitation that was missed, and remove portal access without deleting the client record.

Handle service requests and messages

1

A request arrives

A portal request carries the service type, description, preferred date and priority. It appears in your queue and raises a notification.

2

Turn it into work

Accept it to create a work order or an estimate, keeping the request linked so the customer sees the same thread.

3

Two-way chat

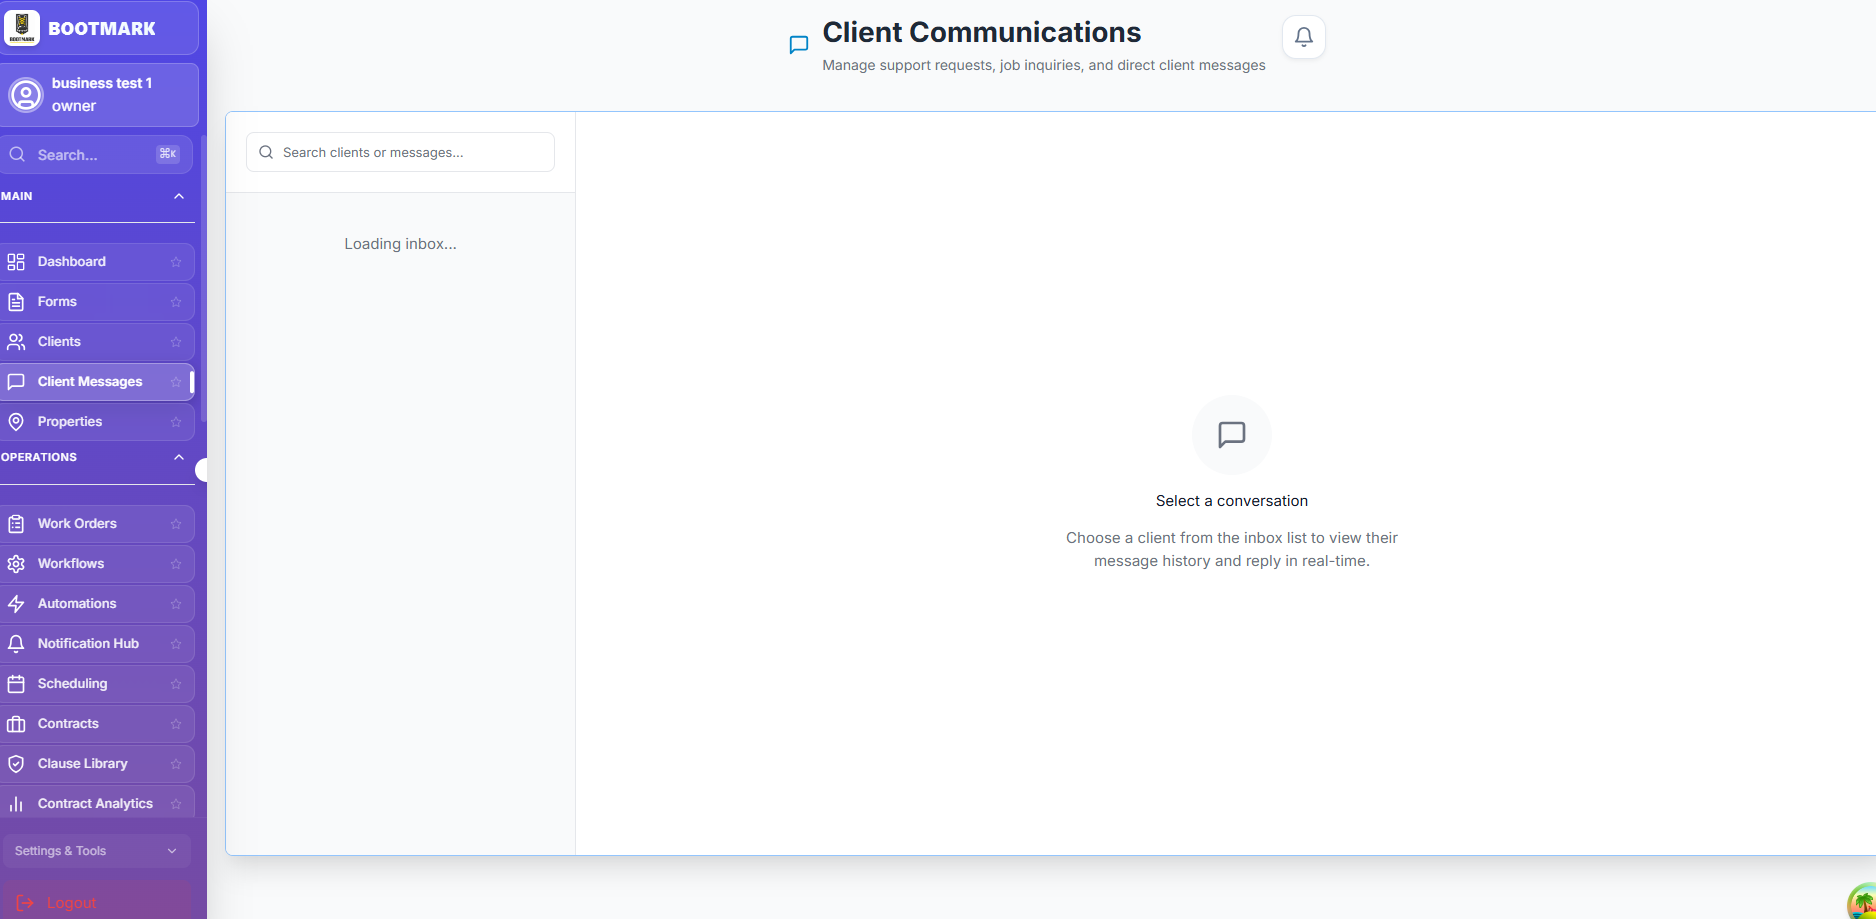
Client Communications groups every conversation in one inbox. Messages are real time in both directions and the client sees them in their portal.

4

Share documents

The client vault holds files you share with a client and files they upload to you, so nothing important lives only in somebody's inbox.

Client Communications groups every conversation by client

Sales & estimating

Work the lead pipeline

1

Where leads come from

Your Connect listing, your public booking page, portal service requests, or added by hand on the Leads page.

2

Move them along

Drag a lead through the stages from New to Won. The pipeline view shows value by stage so you can see what is actually in play.

3

Follow up automatically

Lead automations chase ageing leads so a prospect does not go quiet because everyone was busy.

4

Convert a win

Converting a won lead creates the client record and lets you go straight into an estimate.

Build and send an estimate

1

Start it

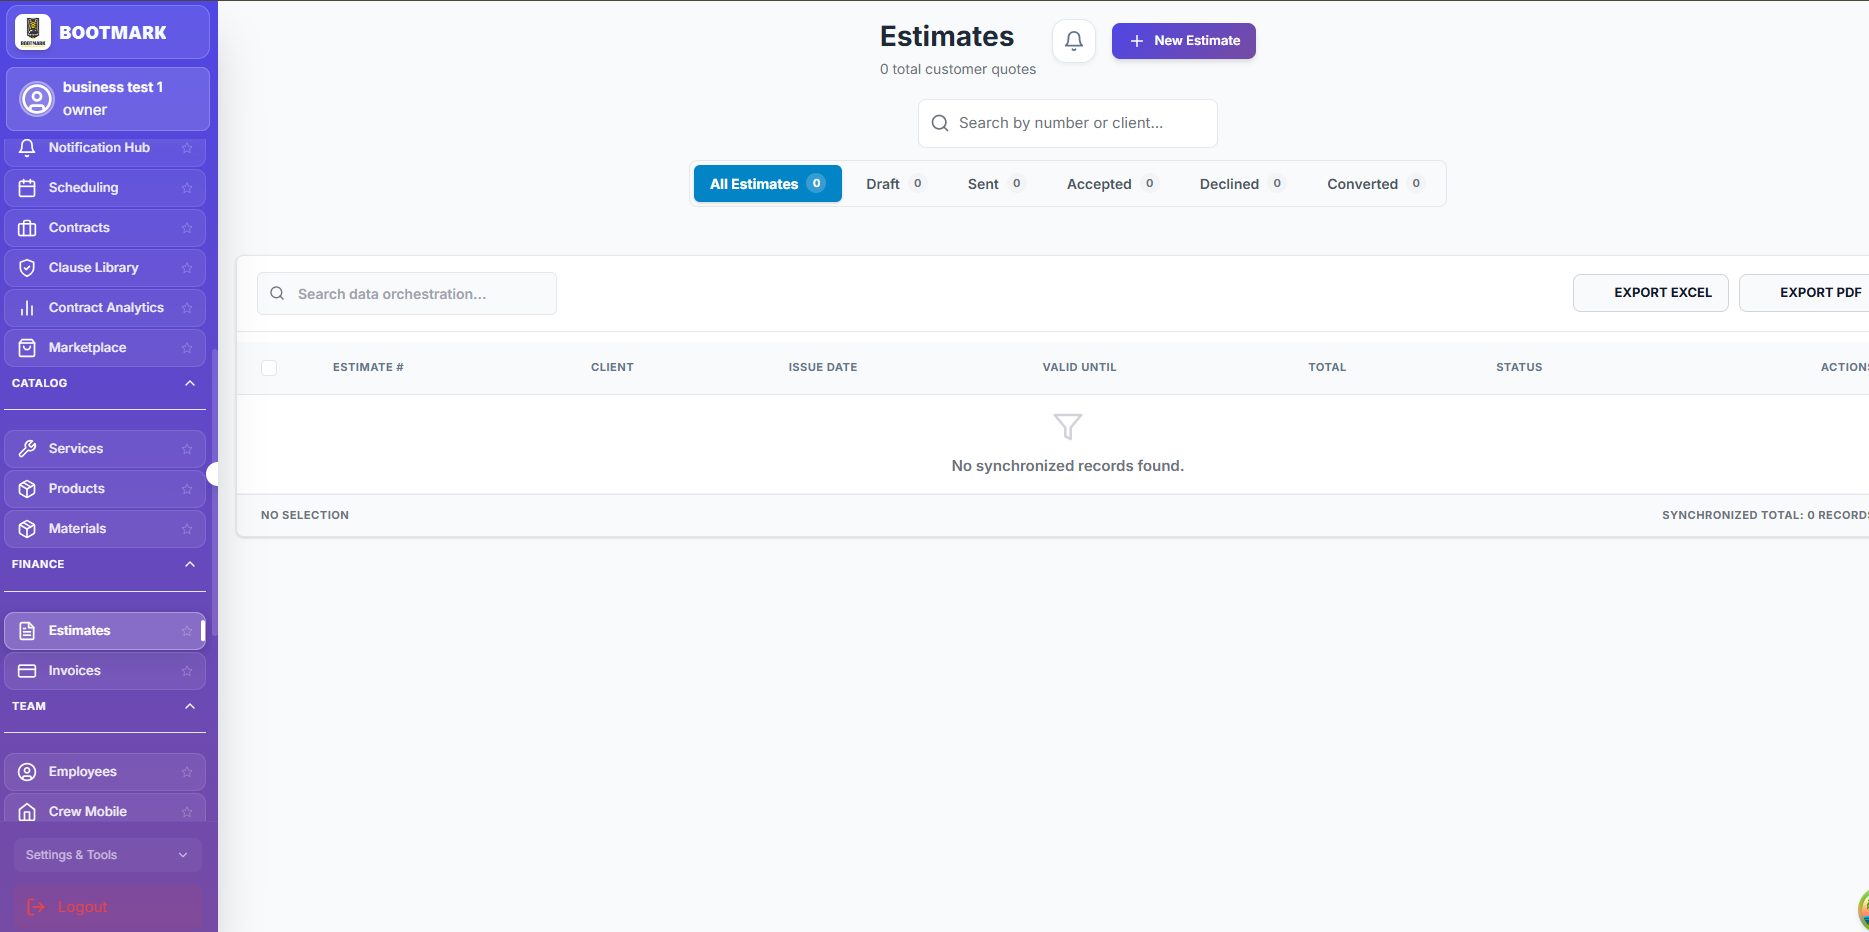
On Estimates choose New Estimate and pick the client. Line items come from your service catalog, or you can type one-off lines.

2

Offer tiers

Add Good, Better and Best options and let the customer choose their own scope. The selected tier becomes the estimate's items and totals.

3

Send it

Email it as a PDF, or share a link. The client can accept from their portal or from the email.

4

Convert it

An accepted estimate converts in one click into an invoice, a work order or a contract — no re-keying.

5

Record the loss

If you lose it, record why from the closed list of reasons. That is what makes the win/loss report answerable.

Estimates from draft through sent, accepted and converted

Work orders & dispatch

Run a work order end to end

1

Create it

From an estimate, a service request, a template or from scratch. Pick the client, the property, the services and the materials.

2

Schedule and assign

Put it on the calendar and assign crew. BOOTMARK warns you if that crew member is already booked at that time.

3

Track the status

The status moves through a defined state machine — draft, scheduled, on the way, in progress, pending approval, completed. Invalid jumps are refused, so the history stays truthful.

4

Approve the completion

A crew member marking the job done sends it for approval. An owner, admin or manager finalises it, and only then do billing, inventory and cost roll-ups fire.

5

Invoice it

Turn a completed job into an invoice in one click, or let the auto-invoice setting draft it for you at the completion transition.

Templates, workflows and recurring jobs

1

Work order templates

Build a template for the jobs you do again and again — services, materials, checklist and duration pre-filled — so creating one takes seconds.

2

Job workflows

Define the stages a particular kind of job moves through, so a roof replacement and a service call do not share the same three statuses.

3

Recurring jobs

Set a cadence (weekly mowing, quarterly maintenance) and BOOTMARK materialises the scheduled work orders for you on a daily run.

4

Merge and duplicate

Duplicate a job to repeat it, or merge several jobs for the same customer into one. Merging refuses across different customers or finished work.

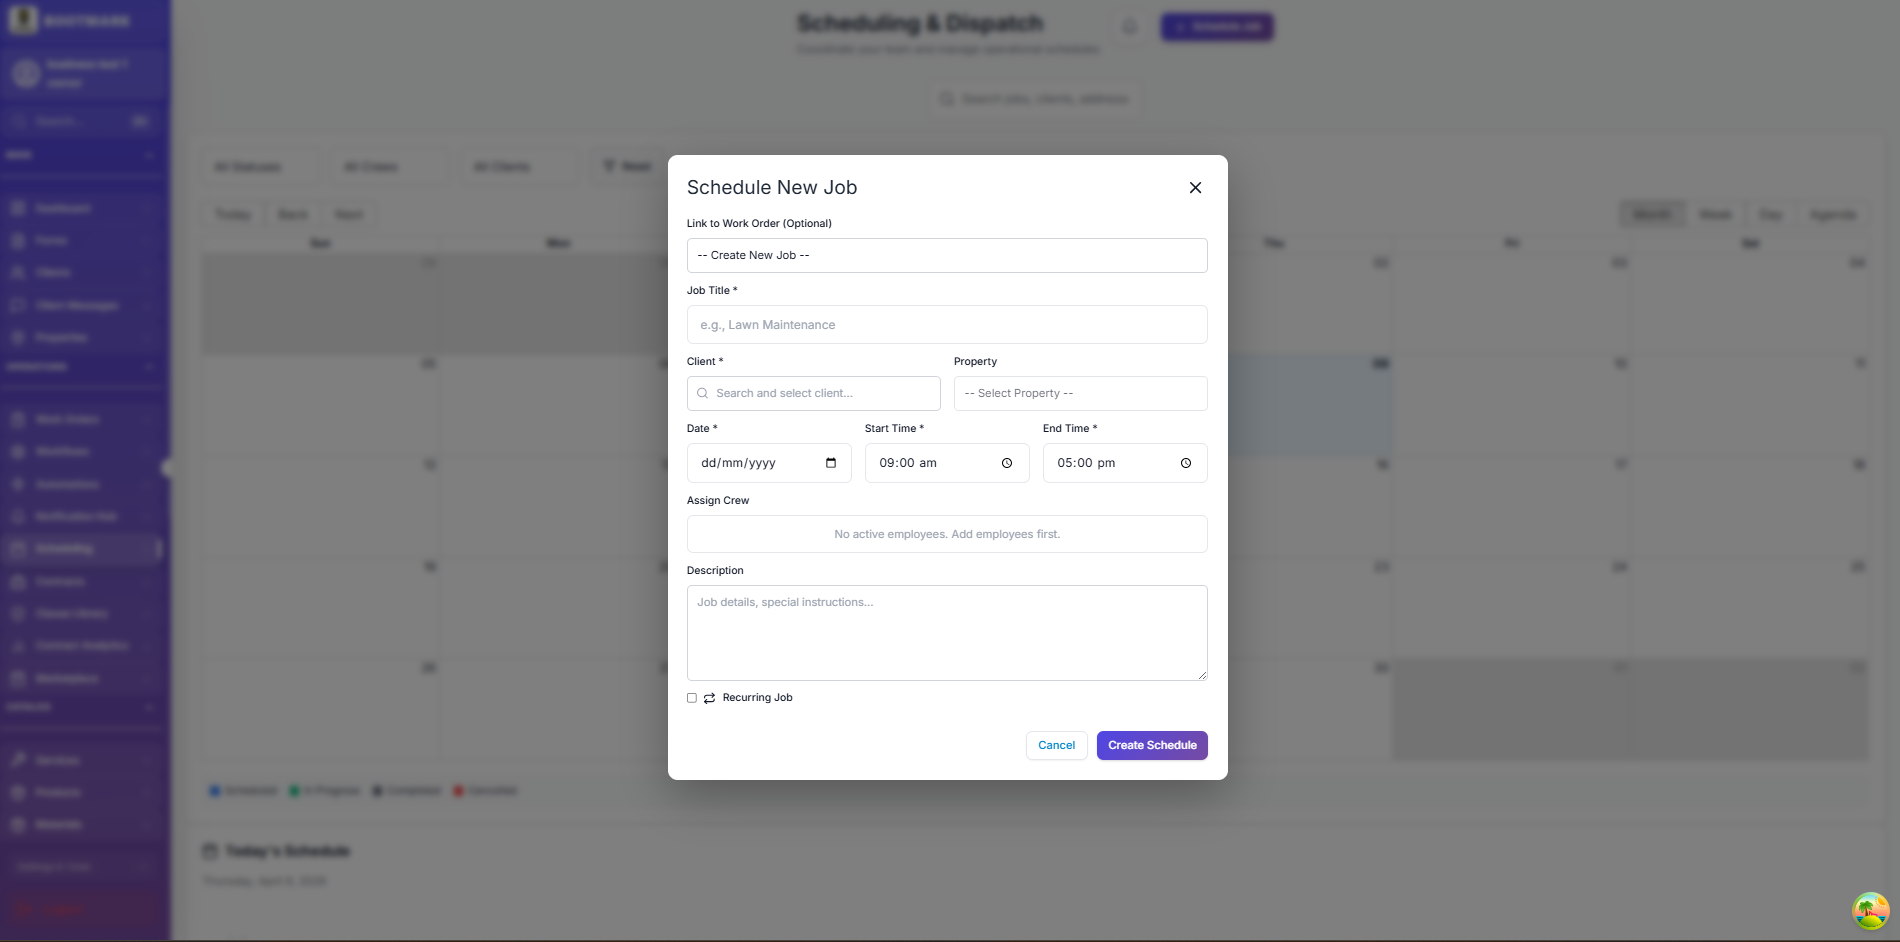
Scheduling a job, including setting it to repeat

Schedule and dispatch a day

1

Pick your view

Day, week or month. Switch to Crew View for one column per crew member and drag jobs between people.

2

Avoid double-booking

Conflict detection checks the crew and the time before the booking is created and asks you to confirm if you really mean to overlap.

3

Optimize the route

Reorder a day of stops to cut driving. Distances are estimated as road miles, not straight lines, so the numbers match reality.

4

Dispatch settings

Control which automated emails go out — including the on-the-way notification — from Dispatch Settings. Automated work-order emails are off until you turn them on.

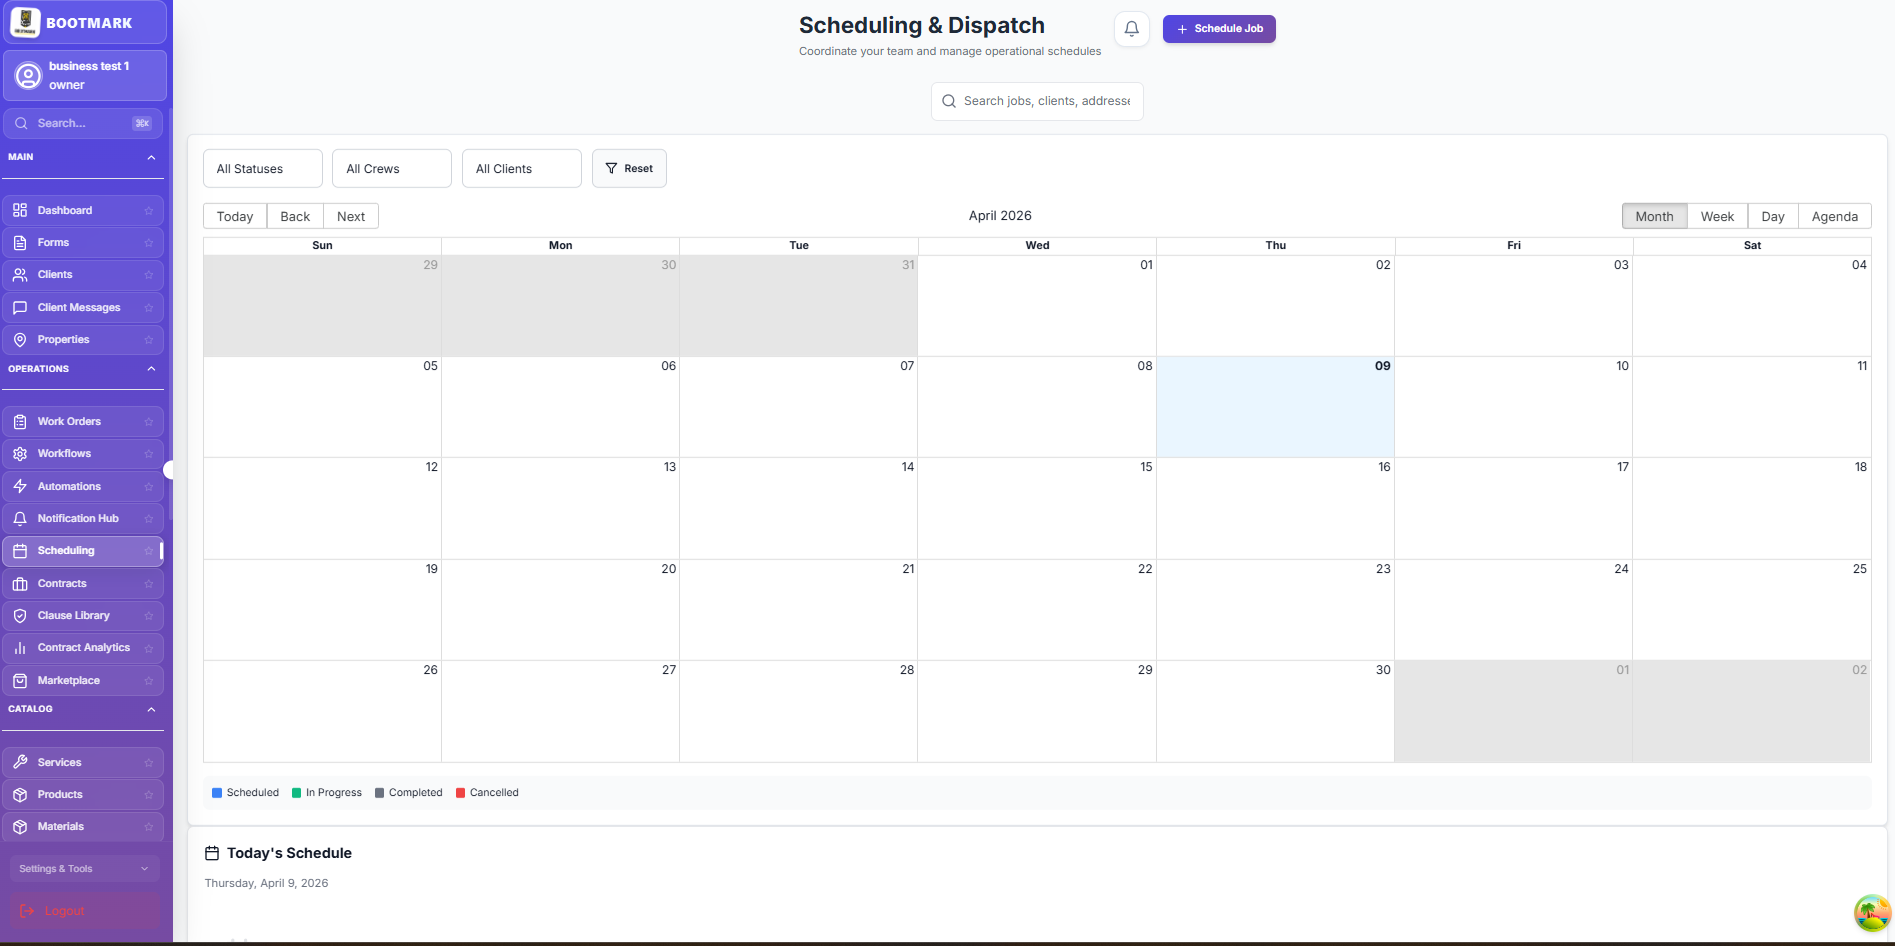
The scheduling calendar, colour-coded by job status

Field & crew

Crew Mobile: a technician's day

1

Only your jobs

Crew Mobile lists the jobs assigned to you and nothing else. The restriction is enforced by the server, not just hidden in the interface.

2

Clock in for real

Clocking in starts a timer that heartbeats while you work, so labour cost reflects hours actually worked. A dead phone auto-closes the entry at the last heartbeat rather than billing all night.

3

Document as you go

Checklist items, notes, before-and-after photos and materials used, all from the phone.

4

Capture the signature

Take the customer signature on the phone at completion; it is stored with the completion record as proof of work.

5

Offline is fine

Everything queues locally without signal — including GPS pings — and syncs when the connection returns.

Time tracking and labour cost

1

Two ways in

Crew clock in and out against a job, or an admin enters hours by hand. Either way the hours attach to the work order.

2

Set the rate

An employee's hourly rate is what turns hours into cost. Without it, labour cost is zero on every job — set it on the employee record.

3

Rules and rounding

Time Tracking Settings control rounding, overtime and whether GPS is required to clock in.

4

Report on it

Time Tracking Reports summarise hours by employee, job and period, and export for payroll.

GPS, ETA and daily logs

1

Live crew map

See where crews are during the working day. Location is captured from the crew app while they are on shift.

2

The customer sees the ETA

When a job goes On The Way, the customer can follow the technician on a map with distance and estimated arrival, shown in miles.

3

Geofencing

Locations can require the crew to be on site to clock in, so hours line up with attendance.

4

Daily logs

Record a dated site log — weather, crew on site, work performed, delays, visitors — for jobs where a defensible daily record matters.

Billing & payments

Create and send an invoice

1

Start from the work

Invoice a completed work order in one click, convert an accepted estimate, or build one from scratch on the Invoices page.

2

Tax done properly

Tax is applied per line item and per jurisdiction rather than one flat rate on the total, so multi-rate work bills correctly.

3

Deposits and partials

Take a deposit up front, record partial payments as they arrive, and watch the balance update. The invoice only becomes Paid when the balance clears.

4

Send it

Email the invoice as a PDF with an optional secure payment link, or copy the link and send it yourself.

5

Consolidate

Merge several invoices for the same customer into the oldest one. Merging refuses if any of them has a recorded payment, so paid revenue is never double-counted.

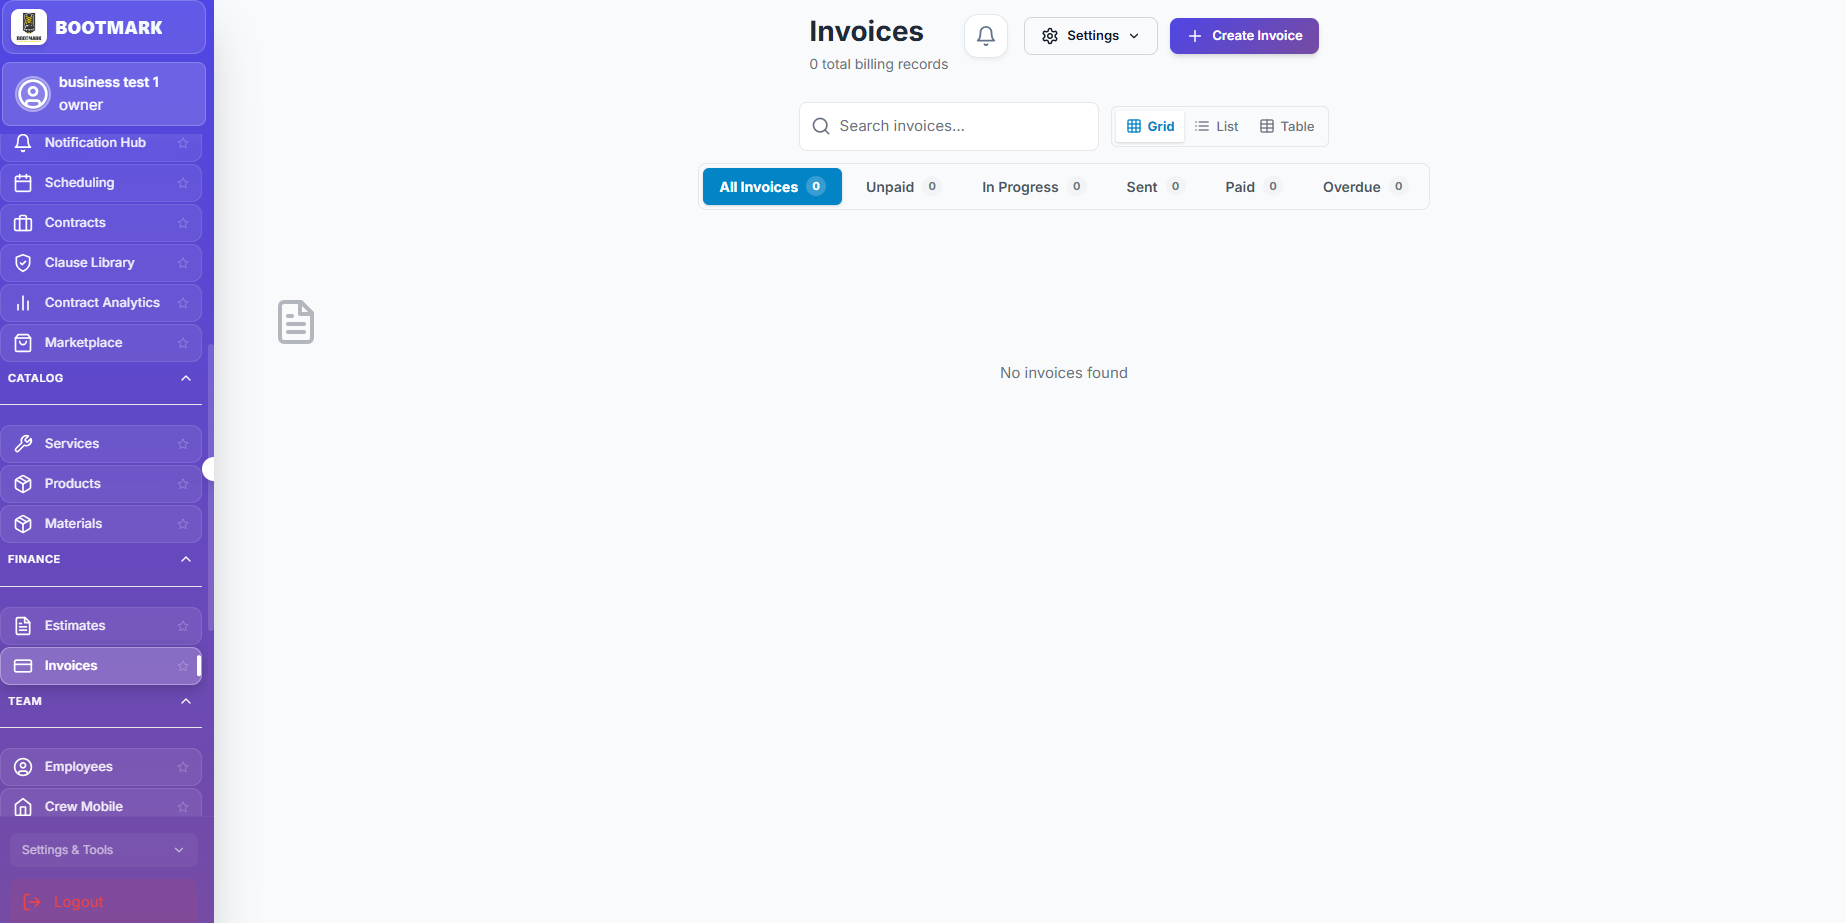
The invoice dashboard: unpaid, in progress and overdue in one view

Set up Authorize.net and take card payments

1

Open a merchant account

Sign up at authorize.net and complete their approval. Each business uses its own account, so money goes straight to you.

2

Generate API credentials

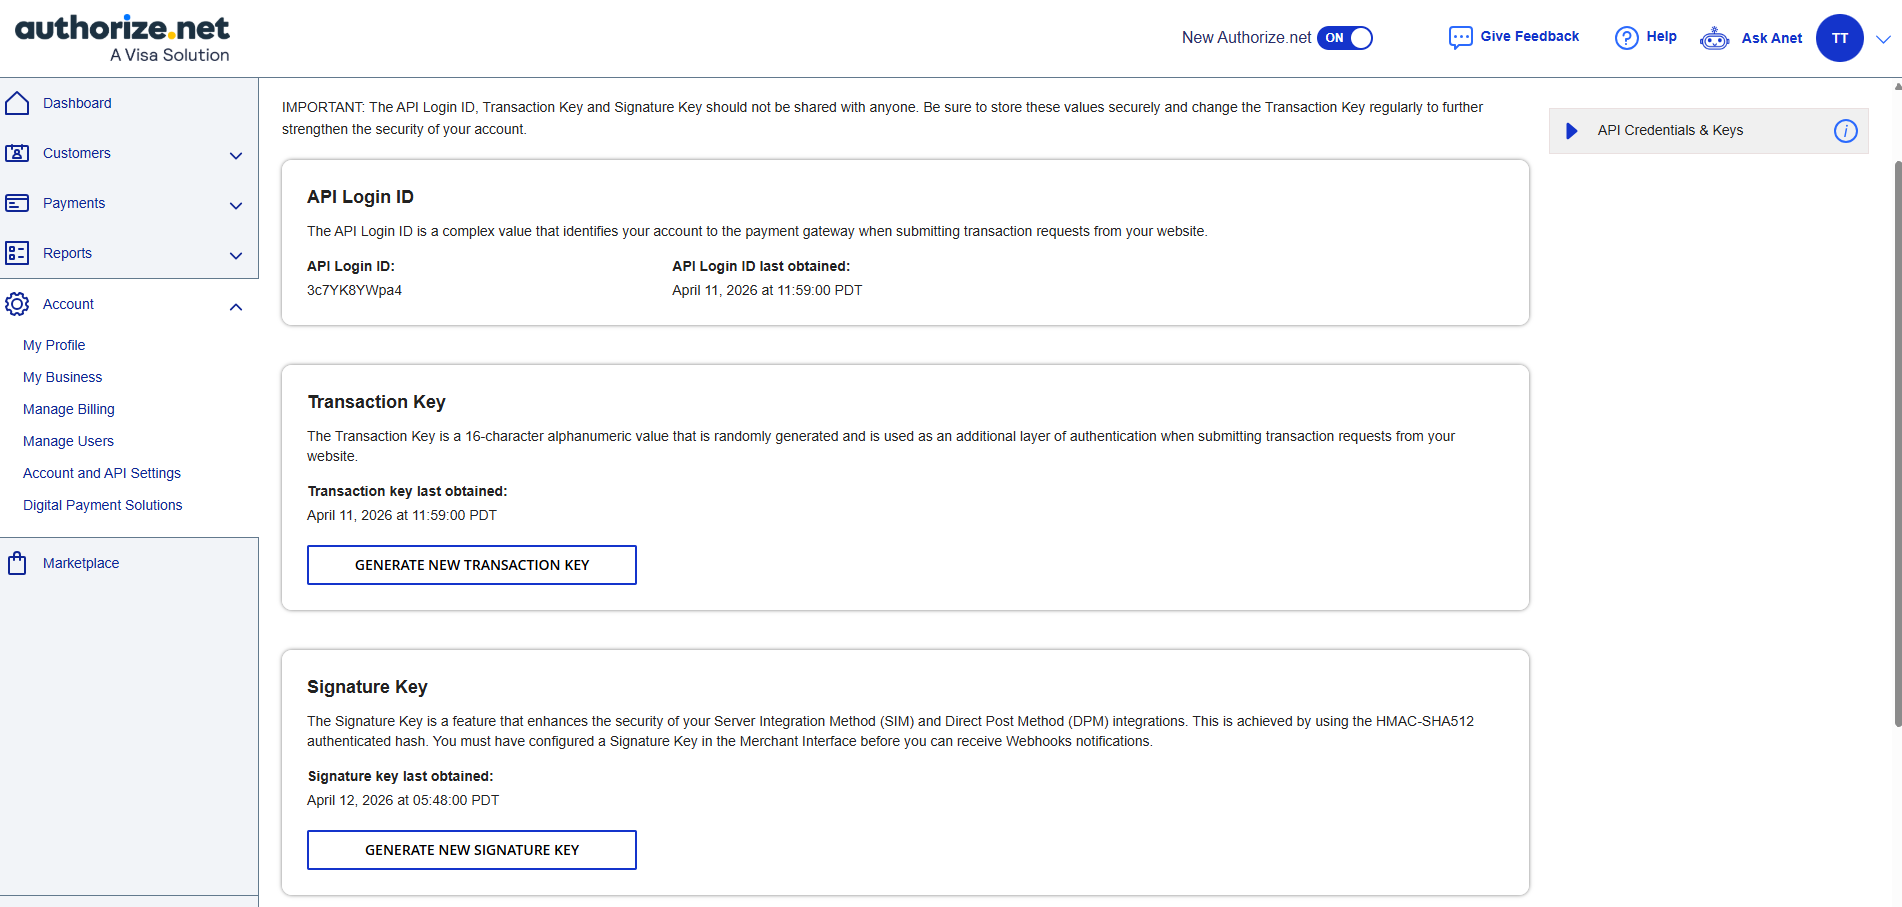
In Authorize.net go to Account, then Security Settings, then API Credentials & Keys. Create an API Login ID and a Transaction Key, and note your Signature Key.

3

Connect it

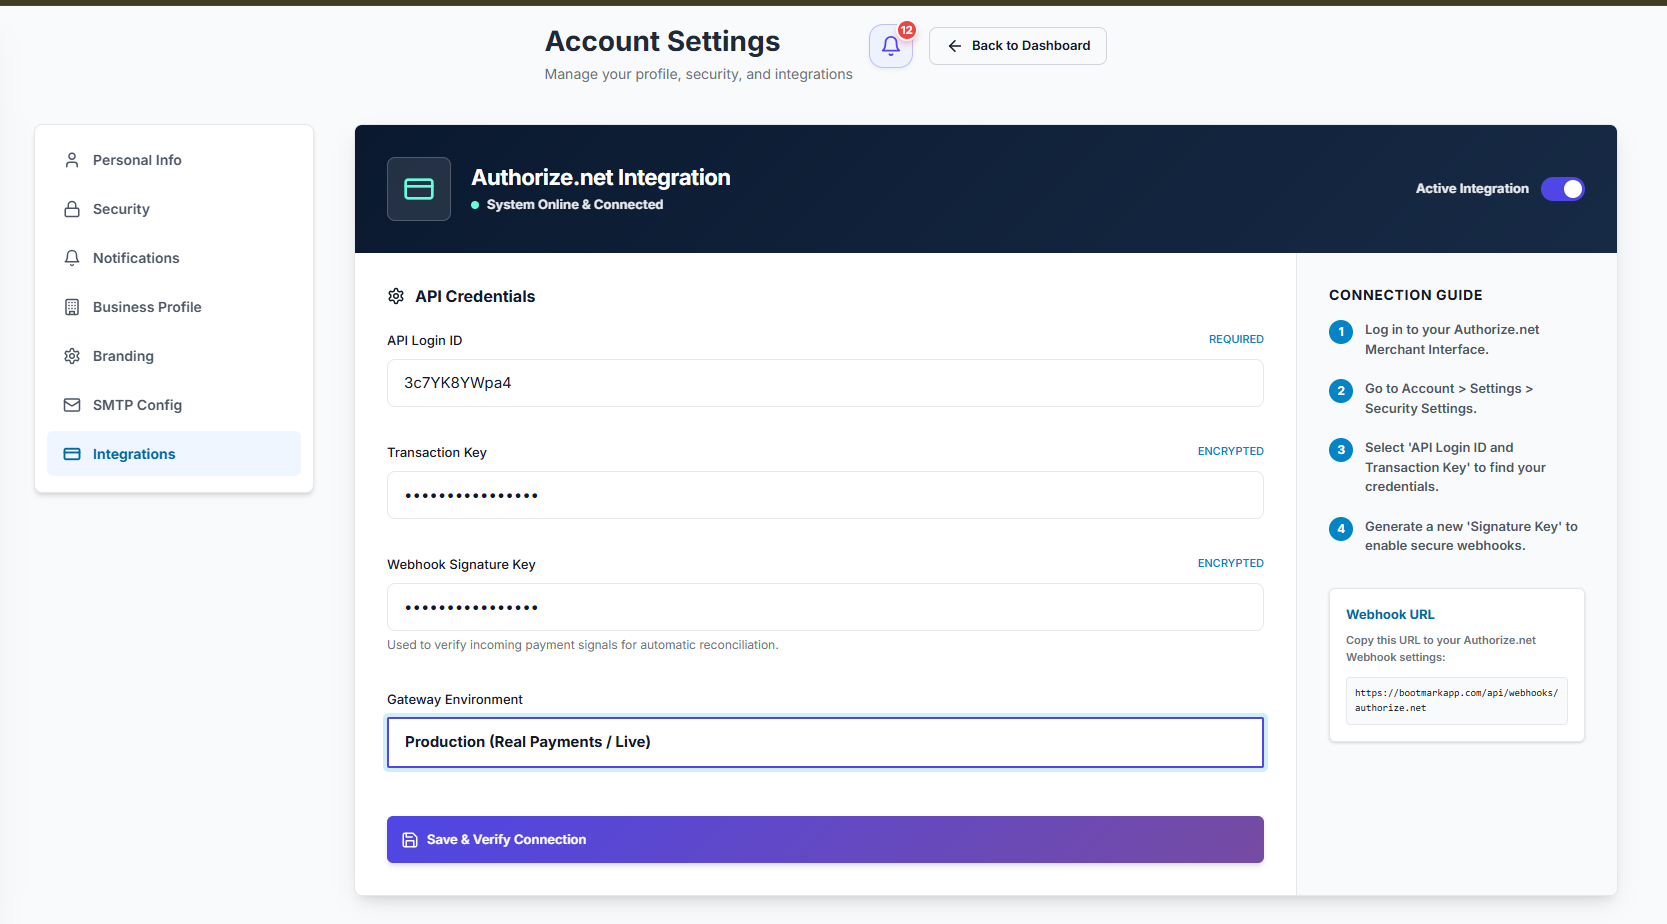
In BOOTMARK open Account Settings, then Payments, and paste the API Login ID, Transaction Key and Signature Key. Choose sandbox or production.

4

Verify the webhook

Add the BOOTMARK webhook URL in Authorize.net so payment results reconcile back automatically. The signature key is what proves a webhook is genuine.

5

Test it

Send yourself an invoice and pay it in sandbox mode before going live. Payments use the hosted secure form — card numbers never touch BOOTMARK.

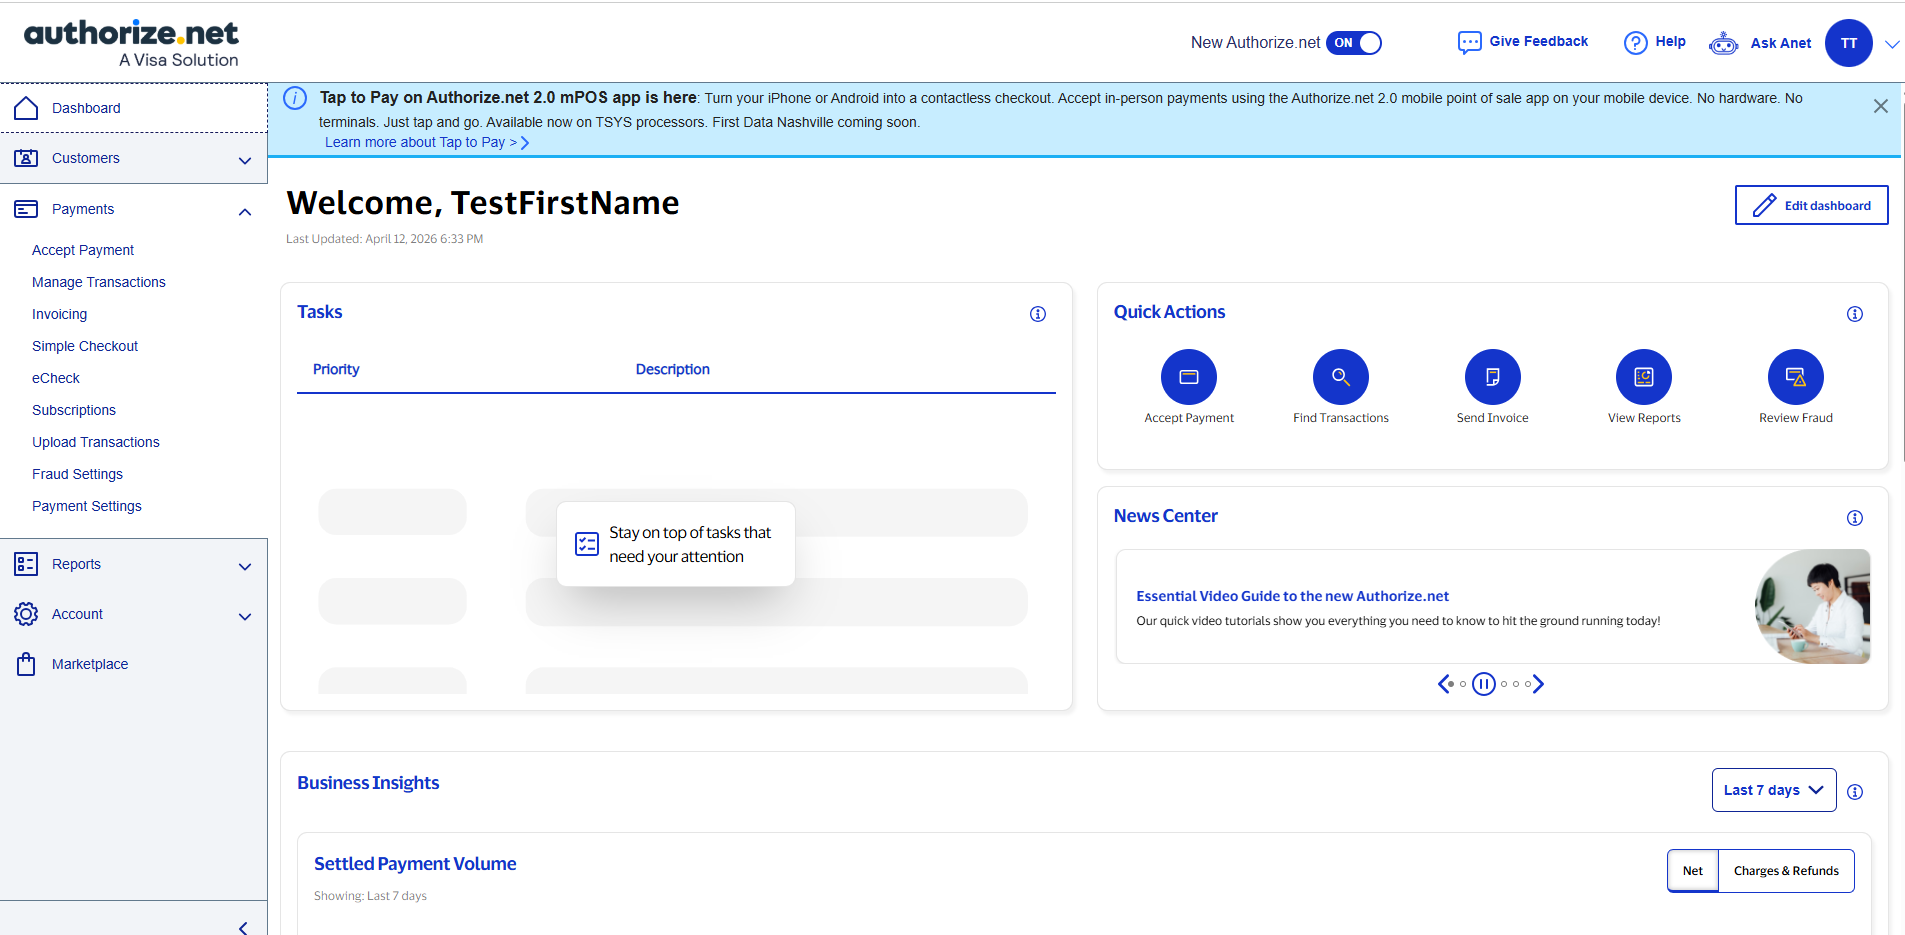
Step 1 — creating the Authorize.net merchant account
Step 2 — generating the API Login ID, Transaction Key and Signature Key
Step 3 — pasting those keys into BOOTMARK's payment settings

Progress billing, retainage and refunds

1

Bill by percent complete

On a contract, bill to a cumulative percentage of the revised contract value. Billed-to-date is derived from the invoices themselves, so it cannot drift.

2

Hold retainage

Withhold a percentage on each progress invoice and release it at the end, the way construction contracts expect.

3

Record a refund

Issue a refund against a payment. The invoice balance and your revenue reporting both reflect it.

4

Chase what is late

Turn on the dunning schedule and BOOTMARK emails overdue reminders on a cadence you set, with an ageing report to back it up.

Contracts & change orders

Send a contract for signature

1

Start from a template

Use a contract template, or assemble one from the clause library so your standard terms are consistent across every agreement.

2

Check the risk

AI risk analysis reads the draft and flags unusual or one-sided terms before it leaves your hands.

3

Send it

Email it, or generate a secure time-limited signing link. The signer does not need a BOOTMARK account.

4

Negotiate

The signing page has a feedback section, so a client can request changes rather than refusing to sign with no explanation.

5

Fully executed

When every required party has signed, the contract becomes executed, the content locks, and an audit certificate is appended to the signed PDF.

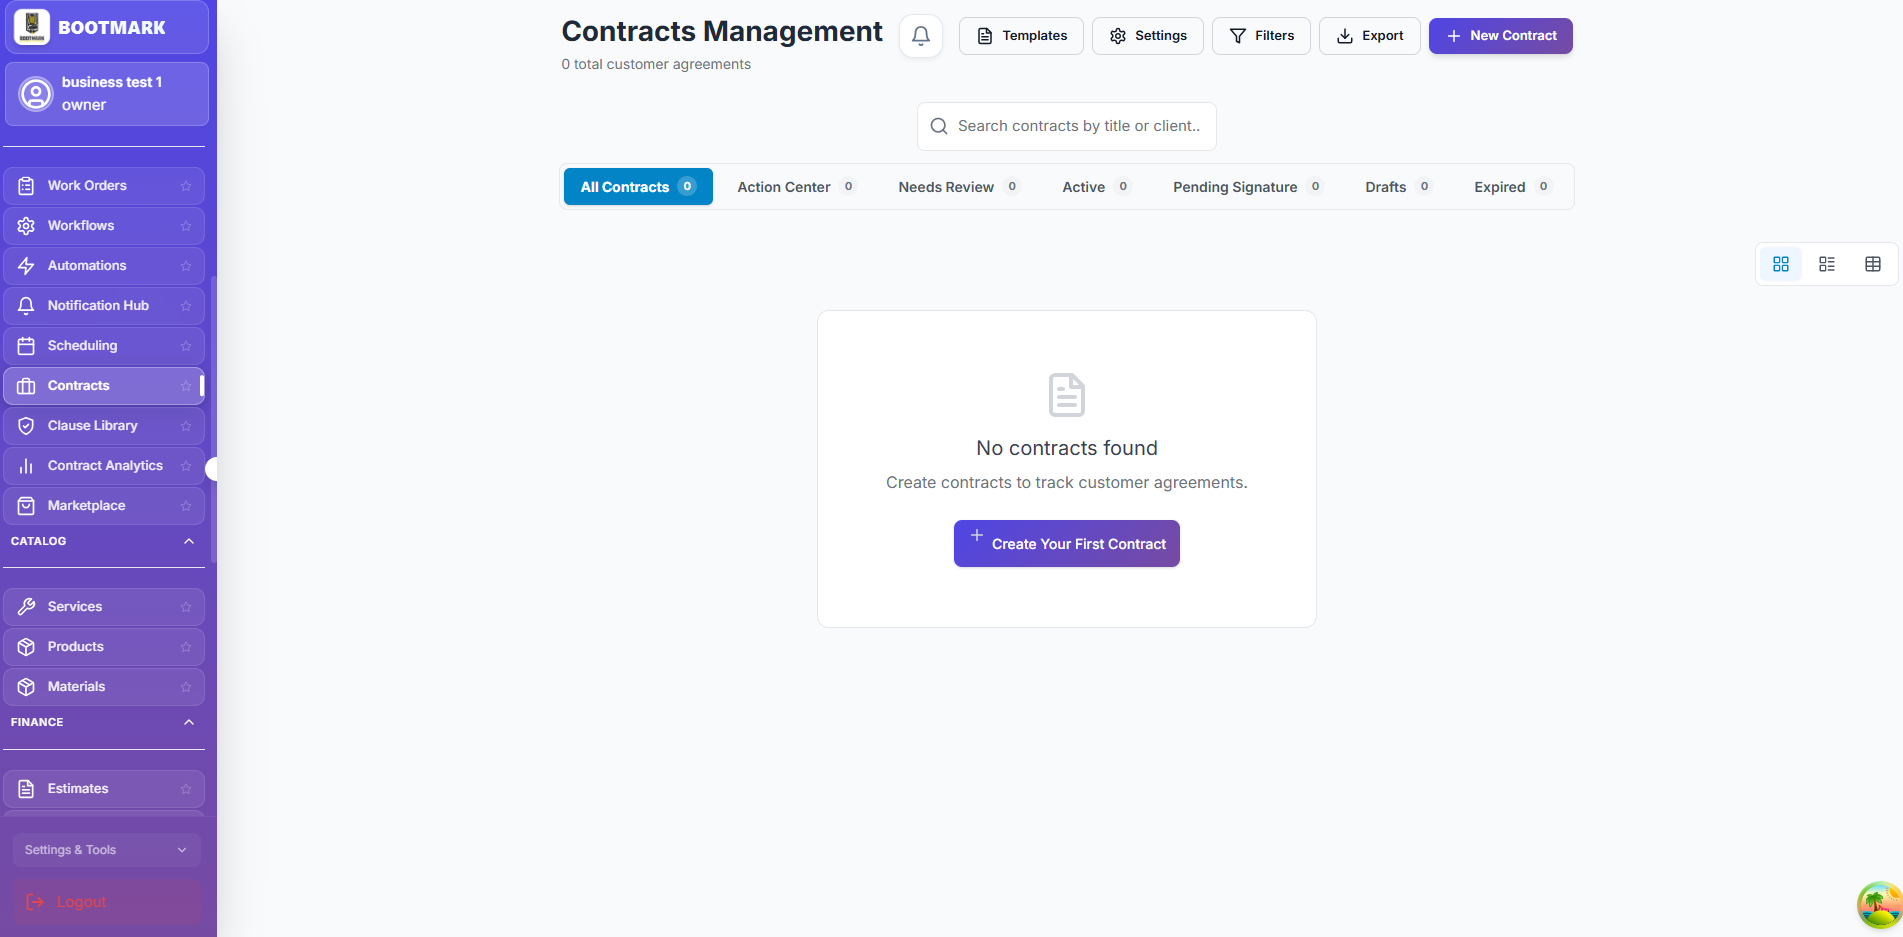
The contracts dashboard, with what needs review or signature surfaced first

Amend a signed contract with a change order

1

Raise it

Create a change order against the contract or the job describing the scope change, its price and its cost.

2

Get it approved

It moves draft to pending to approved. Approval is a separate permission from editing, so nobody approves their own amendment.

3

It applies once

On approval the amount flows into the contract's revised value and the job's costing exactly once — re-approving cannot double-count it.

4

Bill it

Progress billing then bills against the revised contract value, so approved changes are actually invoiced.

Forms & documents

Build a form and collect submissions

1

Blank or Smart PDF

A blank form is built from the drag-and-drop palette. A Smart PDF Form is created by uploading an existing PDF — BOOTMARK detects its fields so the paper form you already use becomes fillable.

2

Add logic

Conditional rules show and hide fields, and formulas calculate totals, so one form covers several situations without becoming a wall of questions.

3

Share it

Publish a public link for customers, or keep it internal for crews. Public forms default to a clean field list; the document overlay is opt-in.

4

Review submissions

Every entry is listed field by field, newest first, with a table view for scanning and CSV export for anything else.

5

Act on them

Form workflows notify people, fire webhooks and create records when a submission arrives.

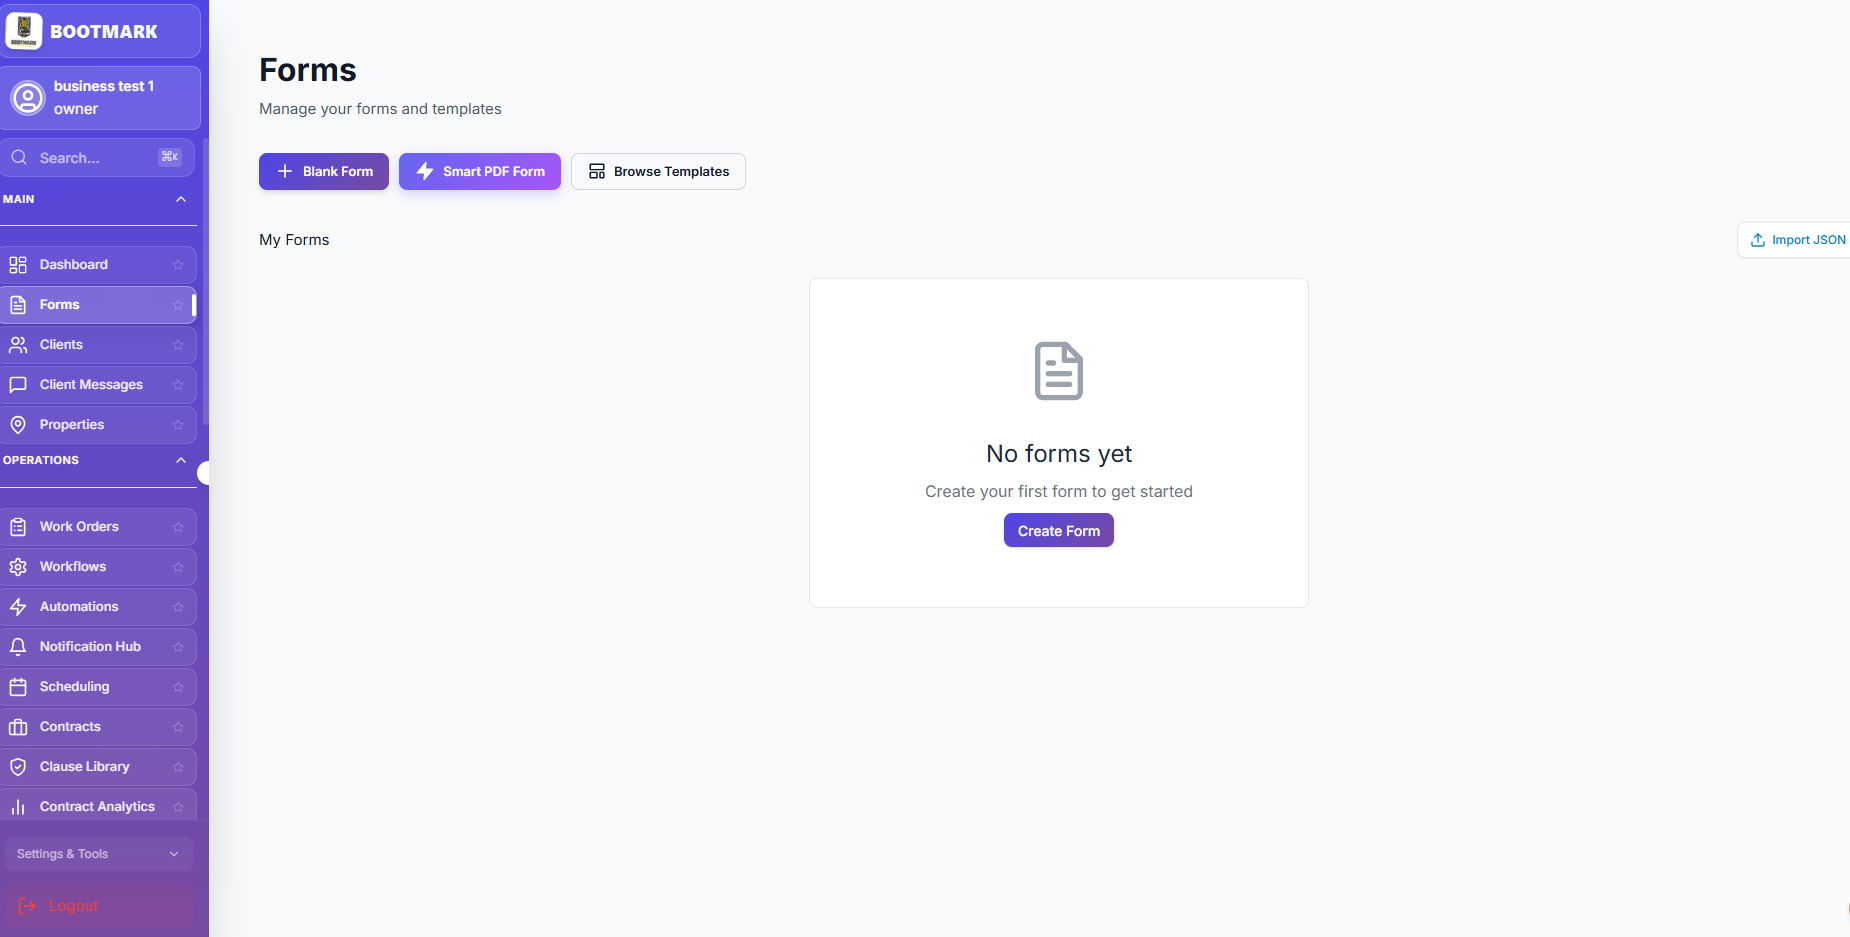
The form library — custom forms and Smart PDF Forms together

Documents and verification

1

Generated PDFs

Estimates, invoices, work orders and contracts all export as branded PDFs carrying your logo and colours.

2

The client vault

Share documents with a client and receive uploads from them, kept against the client record rather than in an inbox.

3

Verify a document

Signed documents carry a verification link. Anyone holding the PDF can confirm it is the genuine, unaltered version.

Inventory, fleet & assets

Build your service catalog

1

Add a service

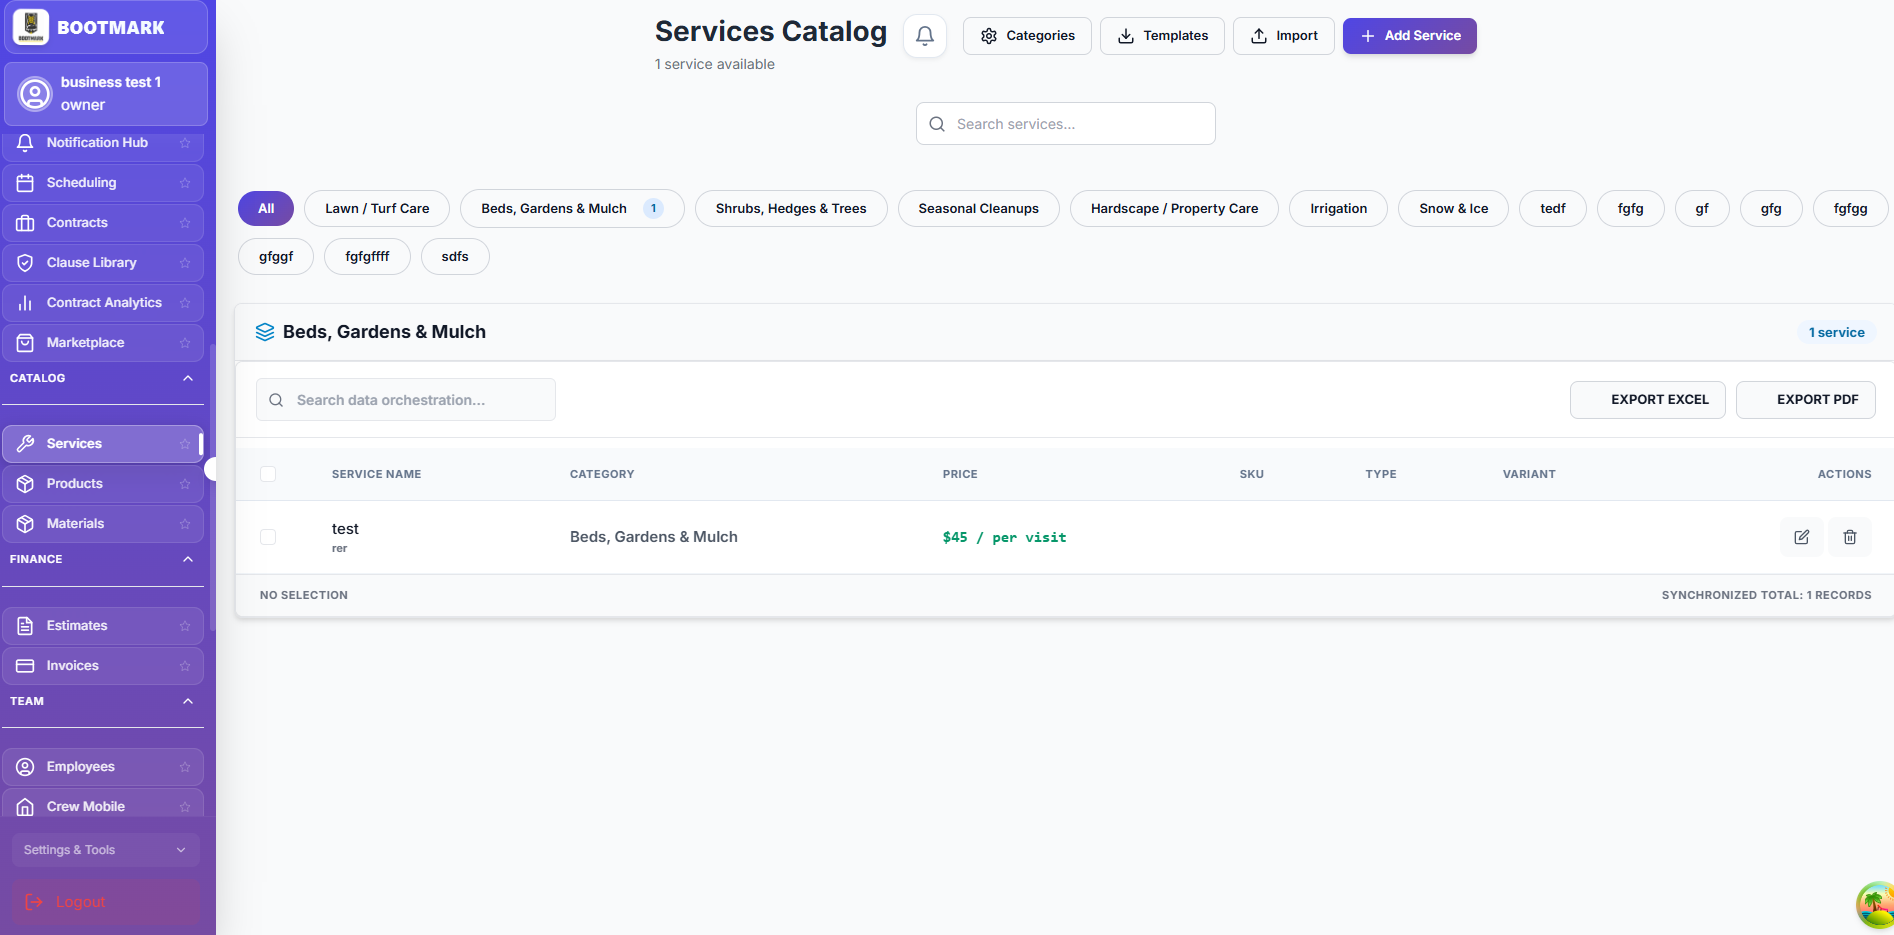
Give it a name, a category, a price and a unit. These become the line items you quote and invoice from, so getting them right once saves typing them forever.

2

Decide who can see it

Each service has a Public toggle. Public services appear on your online booking page and your BOOTMARK Connect listing; private ones stay internal for quotes and office-created jobs.

3

Start from a template

Import a standard set of industry services to populate the catalog quickly, then edit the prices to yours.

4

Keep it current

Prices here drive estimates, invoices and the AI assistant. A stale catalog quietly under-quotes every job that uses it.

5

Export it

The whole catalog exports to Excel for a price review or for sharing with a supplier.

The service catalog: your price list and your public booking menu

Materials, products and restocking

1

Know the difference

Materials are the consumables crews use on jobs. Products are what you sell. Both carry cost, price and stock levels.

2

Set low-stock alerts

Give each item a reorder point and BOOTMARK tells you before you run out on a Friday afternoon.

3

Deduct automatically

Materials recorded against a work order come out of stock when the job is approved as complete — not when it is created.

4

Restock with a purchase order

Raise a PO to a supplier; receiving it tops the inventory back up and records the cost.

5

Move stock between sites

Stock Transfers move inventory between warehouses and vans so van stock is real, not a guess.

Equipment and fleet

1

Track tools

Equipment Checkout records who has which tool and when it is due back.

2

Track vehicles

Fleet holds your vans and trucks with their details and service history.

3

Measure utilisation

Assign a vehicle to a work order and the utilisation report can tell you which vehicles earn their keep.

4

Locations

Warehouses, yards and depots are Locations. They anchor stock levels and can gate clock-in by geofence.

Automation & AI

Automations, workflows and reminders

1

Automations

General when-this-then-that rules across operations, finance and clients — for example, notify a manager when a job is marked done.

2

Job workflows

The stages a work order moves through for a given kind of job, so your process is enforced rather than remembered.

3

Reminders

Scheduled chases for unsigned contracts, unfilled forms and unpaid invoices.

4

The daily digest

Opt in and BOOTMARK emails you a morning summary of the day ahead and what needs attention.

Use the AI assistant

1

Ask anything

The Ask AI widget answers questions about how BOOTMARK works, drawing on this help content.

2

Ask about your data

It can also query your own workspace — how many jobs are open, what is overdue — scoped to what your role is allowed to see.

3

Enter data by voice or text

Describe the record you want and it drafts it, then shows you exactly what will be saved before anything is written.

4

The command center

BOOTMARK AI is the whole-business view: ask across modules and get a single answer instead of five reports.

Control AI with the AI Control Center

1

See the status

One banner tells you whether AI is available at all, so a quiet assistant is never a mystery.

2

See the spend

Token usage is metered per feature, so you can see what AI is actually costing you and where.

3

Switch features off

Toggle individual AI features, or use the kill switch to stop all AI immediately. The switches are enforced centrally, not per page.

4

Plan and permission

AI features are gated by plan and by permission, so you decide which staff can use them.

Reporting & analytics

Reports, analytics and job costing

1

Business reports

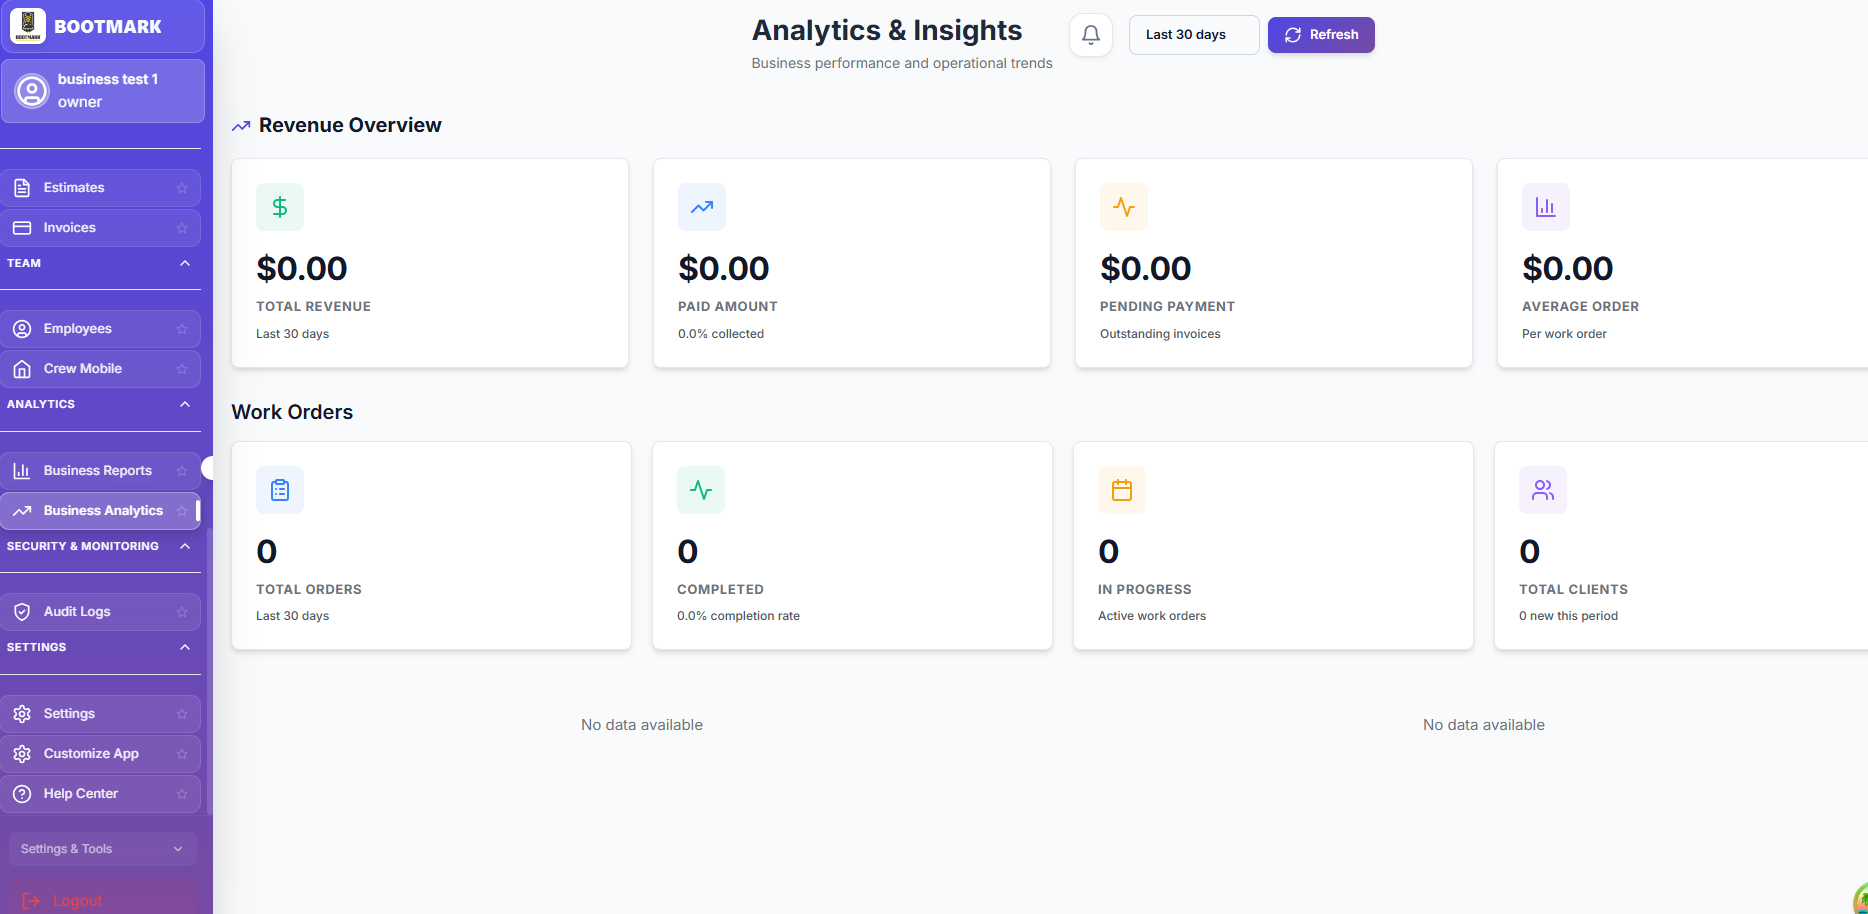
Sales summary, work orders, client activity, inventory, revenue trends and service distribution, each filterable by date range.

2

Analytics

Trends, forecasts and comparisons across periods, for when the question is where things are going rather than what happened.

3

Job costing

Material cost, labour cost and approved change orders roll into a total cost per job, so margin is measured rather than assumed.

4

Win/loss

Every lost bid carries a reason from a closed list, which is what makes why do we lose an answerable question.

5

Export

Reports export to CSV and Excel for anything you would rather do in a spreadsheet.

Revenue, job volume and completion trends

CSAT and the audit log

1

Ask the customer

CSAT collects a satisfaction score after a job and shows the trend by crew and service.

2

Audit log

Every meaningful change records who did it, when and what changed — the record you need when an account disputes what happened.

3

Search it

Filter by user, record type and date to reconstruct a sequence of events.

BOOTMARK Connect

List your business on BOOTMARK Connect

1

Build the listing

On Connect Setup add your description, service area, categories, photos and pricing signals.

2

Publish it

A listing must have a category before it can be published — that is what makes it findable in search.

3

Receive bookings

Customers search by category and location, view your profile and request or book work. Bookings land in Connect Bookings and flow into your normal pipeline.

4

Build reputation

Reviews are verified against real completed bookings, so the rating reflects work actually done.

5

If something goes wrong

The dispute flow gives customers and providers a structured path with escrow states, rather than an argument over email.

Team, roles & security

Invite your team and set permissions

1

Add an employee

On Employees choose Add Employee. Invite an existing user or create a new login; credentials are emailed to them.

2

Pick a role

Owner, admin, manager, staff and crew form a hierarchy. Higher roles include everything below them.

3

Fine-tune with permissions

Grant or withhold access area by area — a staff member can see jobs but not invoices, for example. Permission changes take effect live, without a re-login.

4

Crew assignment

Assigning crew to a job is what makes it appear in their Crew Mobile list, so assignment is the control that matters day to day.

5

Remove access

Deactivating an employee ends their access immediately while keeping their history intact.

Two-factor authentication and session security

1

Turn on 2FA

Enrol an authenticator app from your account settings. Owners should enable it before anyone else.

2

Step-up for sensitive actions

Some actions demand a fresh second-factor check even inside a valid session, so a stolen session alone is not enough.

3

Re-enrolling

Replacing an existing second factor also requires a step-up check, so an attacker cannot swap it out quietly.

4

Sessions

Sessions expire on inactivity and can be ended centrally. A blocked or suspended account loses access immediately.

Account & customization

Brand the app as your own

1

Open App Customization

Available to owners and admins, or anyone with the customization permission, on the Business Suite plan.

2

Logo and colours

Upload your logo and set your brand colours. They apply across the app, the client portal and every generated PDF.

3

Theme and formats

Choose light or dark, set your currency, tax defaults, and how numbers and dates are formatted.

4

Turn features off

Hide feature areas your business does not use so your team sees a smaller, clearer product.

Send email from your own address

1

Why bother

Mail from your own domain lands better and looks like you, not like a tool you use.

2

Get SMTP details

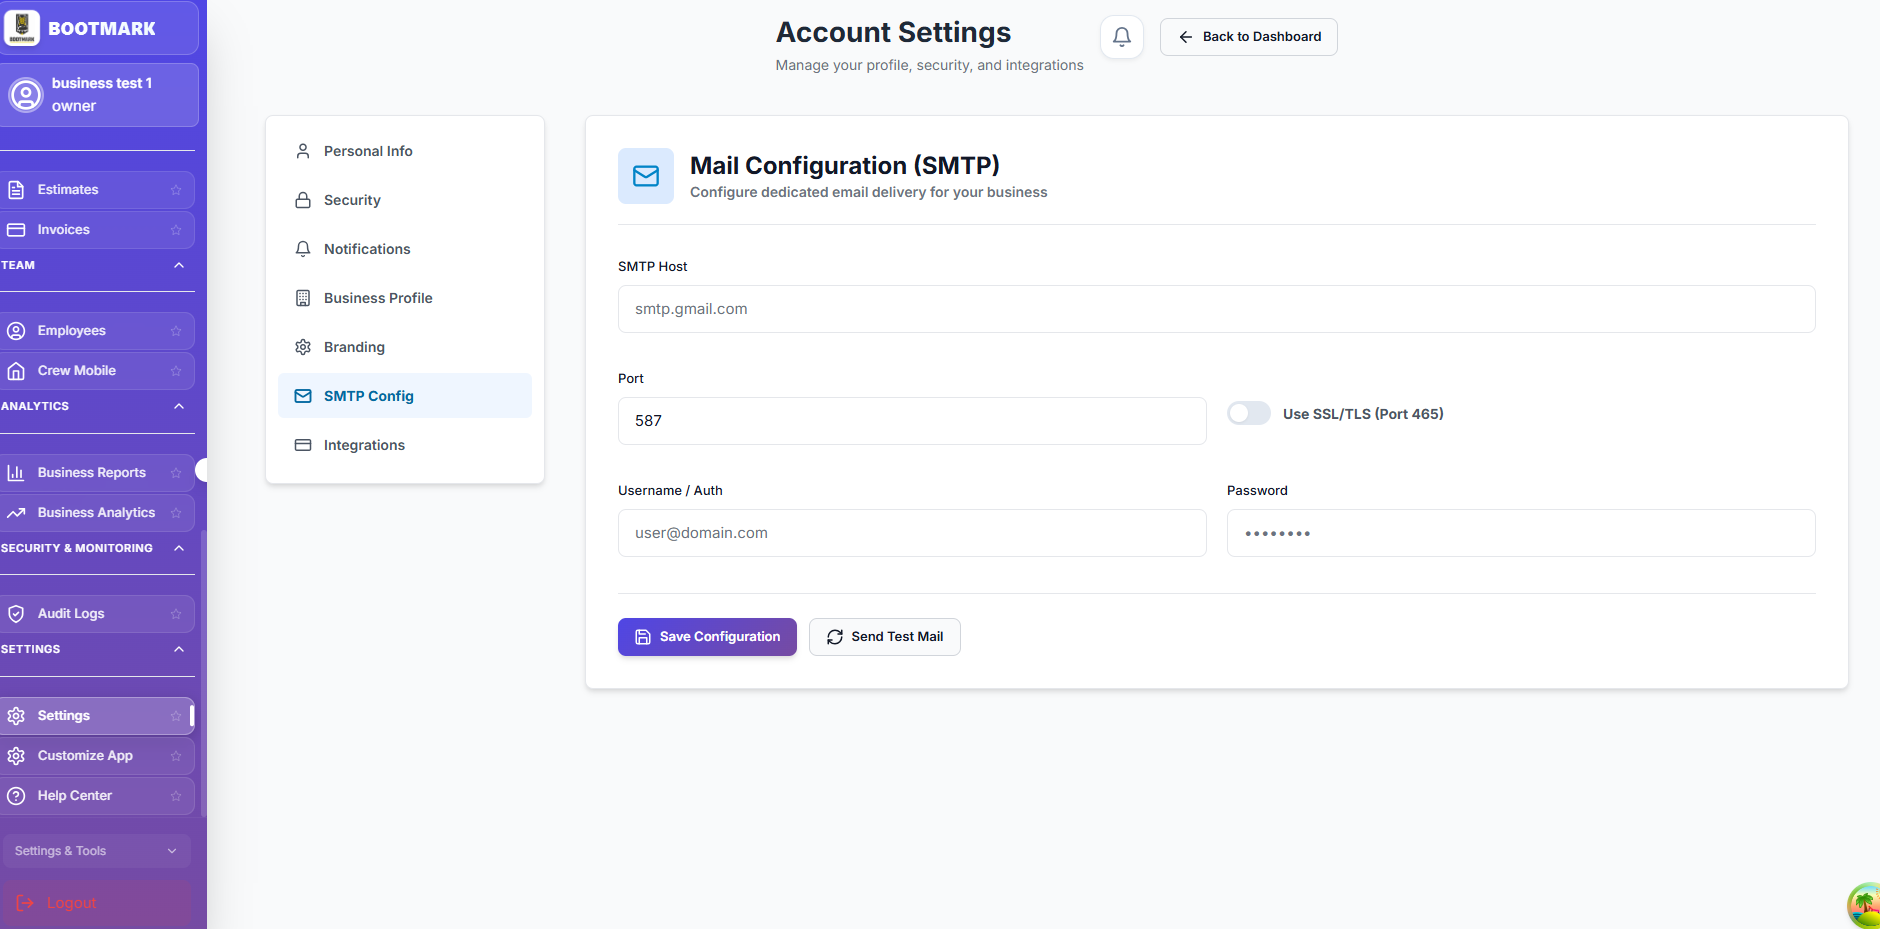
From your mail provider — Gmail, Microsoft 365 or your host — collect the host, port, username and an app password.

3

Enter them

In Account Settings open the email section and enter the details. Use an app-specific password, never your account password.

4

Send a test

Send a test message before relying on it. Until SMTP is configured, mail goes out from the platform default sender.

SMTP settings, with a test-send before you rely on it

Plans, limits and your subscription

1

What the tiers do

Free covers a small operation. Journal documents work. Pro manages field operations. Business Suite runs the whole company, including invoicing, payments, the client portal, automations, branding and AI.

2

Limits are real

Each plan caps jobs, crew, clients, contracts, storage and more. You are told when you approach a limit rather than being cut off without warning.

3

Change plan

Upgrade from the subscription page. Feature areas gated to a higher tier unlock immediately on upgrade.

4

Export your data

An owner or admin can export the workspace's data at any time. Secrets are redacted from the export by design.

Developers & API

Issue an API key

1

Open the Developer page

Settings, then Developers & API. Only the owner and admins can manage credentials.

2

Name it after its consumer

Name the key after the system that will hold it, so revoking the right one later is obvious.

3

Grant the least it needs

Tick only the scopes the integration requires. A write scope includes read for that resource; nothing outside the ticked scopes is reachable.

4

Copy it once

The key is shown exactly once. BOOTMARK stores only a one-way hash, so it cannot be shown again — lose it and you issue a new one.

5

Set an expiry

An expiring key limits the damage of a leak. You can revoke any key instantly, which stops it working on the next request.

Call the REST API

1

Base URL

Calls go to /api/v1/<your-workspace>/... — the exact base URL is shown on the Developer page.

2

Authenticate

Send the key as an Authorization bearer token. A key only ever works against its own workspace.

3

Check the connection

GET /developer/me needs no scope and echoes back the workspace and the exact scopes granted — the fastest way to confirm a key works.

4

Retry safely

Send an Idempotency-Key header on create requests. A retry with the same key replays the original response instead of creating a duplicate.

5

Respect the limits

A key may make 300 requests per minute. Exceeding it returns 429 with a retry hint rather than failing silently.

Subscribe to webhooks

1

Add an endpoint

Give BOOTMARK a public HTTPS URL and tick the events you want. Private and internal addresses are rejected.

2

Store the signing secret

Each endpoint gets its own secret, shown when you create it and revealable later by an admin. Rotate it whenever you need to.

3

Verify every delivery

Compute HMAC-SHA256 of timestamp.rawBody with your secret and compare it to the signature header. Reject anything older than five minutes so a captured request cannot be replayed.

4

Answer fast

Return a 2xx quickly and do the work afterwards. Deliveries time out after ten seconds and are retried with backoff.

5

Watch the log

The delivery log shows every attempt, its status code, its retries and the payload sent, so a failing consumer is diagnosable.

FAQ

Frequently asked questions

Quick answers to the most common questions. Can't find yours? Contact support below.

Getting started

Create an account with email and password or with Google, then complete the two-step registration: your company basics (name, business type, currency, address) and the service categories you offer. You get a unique web address, you become the Owner, and your workspace is live immediately.

Getting started

Yes. Registration activates your workspace immediately on the Free plan — there is no review queue. You land on your dashboard with a setup checklist that walks you through your first client, service, crew member and estimate.

Getting started

Follow the setup checklist on the dashboard in order: add a client, build two or three catalog services, invite one crew member, then send a real estimate. That single pass exercises the whole pipeline and leaves you with something usable rather than a half-configured account.

Getting started

Yes. It is an installable progressive web app — add it to your home screen and it behaves like a native app, including push notifications and offline support for crew screens. Crew Mobile is a purpose-built phone view of just the jobs assigned to you.

Getting started

Crew screens keep working. Actions and GPS pings queue on the device and sync automatically when the connection returns, so a basement or a rural site does not cost you the record of the work.

Team & security

On the Employees page choose Add Employee and either invite an existing user or create a new login — credentials are emailed. Then pick a role (owner, admin, manager, staff, crew) and fine-tune access area by area. Permission changes take effect live, without the person re-logging in.

Team & security

No. Crew Mobile only lists jobs assigned to that person, and the server enforces it — a crew member cannot open or edit somebody else's work order even by guessing the address.

Team & security

Enrol an authenticator app from your account settings. Some sensitive actions then require a fresh second-factor check even inside a valid session, and replacing an existing second factor also requires that check, so nobody can quietly swap it out.

Team & security

Only an owner, admin or manager. A crew member marking a job done moves it to pending approval rather than completed, and the completion side-effects — inventory deduction, cost roll-up, auto-invoice — only fire when an approver finalises it.

Clients

On the Clients page choose New Client and enter the name (the only required field) plus optional company, email, phone, address, tags and notes. To move an existing list across, use the CSV import: map your columns to BOOTMARK fields and review before committing.

Clients

Make sure the client has an email on file, then choose Send Invitation from the client list or the client record. They receive a link to set their own password. You can re-send an invitation that was missed, or remove portal access without deleting the client.

Clients

See balances and activity, view and download invoices and pay online, review and accept estimates, sign contracts, book services, raise service requests, track a crew on its way, message you in real time, and access documents you have shared.

Clients

It arrives with the service type, description, preferred date and priority, appears in your queue and raises a notification. Accept it to turn it into a work order or an estimate, and the customer keeps seeing the same thread.

Clients

It is a real-time two-way chat. Client Communications groups every conversation into one inbox on your side, and the client sees the same thread in their portal — so nothing depends on somebody remembering to forward an email.

Sales

Open Estimates, choose New Estimate, pick the client, and add line items from your catalog or as one-offs. Send it by email or link. Once the client accepts, convert it in one click into an invoice, a work order or a contract — no re-keying.

Sales

Yes. Add Good, Better and Best tiers to an estimate and the customer picks their own scope. The tier they select becomes the estimate's line items and totals, so everything downstream — invoice, job, contract — reflects what they actually chose.

Sales

Because an optional reason field is one nobody fills in, and then why do we lose stops being answerable. The reason comes from a closed list so the answers can actually be counted in the win/loss report.

Sales

Your BOOTMARK Connect listing, your public booking page, service requests from the client portal, or entered by hand on the Leads page. All of them land in the same pipeline so nothing is tracked in a second place.

Operations

A work order starts as a draft or at your workflow's first stage, gets scheduled and assigned, then moves through on the way, in progress and pending approval to completed. The transitions are a defined state machine, so invalid jumps are refused and the history stays truthful.

Operations

On the Scheduling calendar turn on Crew View to get one column per crew member, then drag the job to a different person. Optimize Route reorders a day of stops to cut driving; distances are estimated as road miles rather than straight lines, so the numbers match what the van will actually do.

Operations

It warns you before the booking is created and asks you to confirm if you genuinely mean to overlap — deliberate double-booking is sometimes correct, so it is a check rather than a block.

Operations

When the job status changes to On The Way, the customer can follow the technician on a live map with distance and an estimated arrival time, shown in miles. Whether that notification is sent is controlled in Dispatch Settings.

Operations

Yes. Recurring Jobs take a cadence — weekly mowing, quarterly maintenance — and materialise the scheduled work orders for you on a daily run, so a maintenance contract does not depend on someone remembering.

Field & crew

Two ways. Crew clocking in and out against the job records real hours, or an admin enters hours by hand. Either way, hours become cost only if the employee has an hourly rate on their record — without it, labour cost is zero on every job.

Field & crew

The timer heartbeats while the crew member works. If the phone dies or the app closes, a sweep auto-closes the entry at the last heartbeat rather than at the moment somebody noticed, so the recorded end time is the last time they were genuinely working.

Field & crew

Completion captures a checklist, before-and-after photos, materials used and the customer's signature on the phone, all stored as the job's completion record. Signed documents also carry a verification link so anyone holding the PDF can confirm it is genuine.

Billing

Include a secure payment link when you send the invoice, or share the link yourself. Payment runs through Authorize.net's hosted secure form. The invoice becomes Paid only when the balance actually clears — a partial payment reduces the balance and leaves it open.

Billing

Authorize.net, using their hosted secure form so card numbers never touch BOOTMARK. Each business connects its own merchant account in Account Settings under Payments with an API Login ID, Transaction Key and Signature Key, so money goes straight to you.

Billing

Yes. Record a manual payment (cash, check or ACH) against an invoice with a specific amount and date. Deposits and partial payments are supported, and the balance updates as each one lands.

Billing

Tax is applied per line item and per jurisdiction rather than as one flat rate on the total, so a job that mixes taxable and non-taxable work — or crosses a rate boundary — bills correctly.

Billing

Yes. Progress billing bills a cumulative percentage of the revised contract value, with retainage held back and released at the end. Billed-to-date is derived from the invoices themselves, so the figure cannot drift from reality.

Billing

Yes — merge them into the oldest invoice. Merging refuses if any of them already has a recorded payment, and the source invoices' revenue is reversed so nothing is counted twice.

Billing

If you opt in. The dunning schedule emails reminders on a cadence you set, backed by an ageing report. It is off by default so nobody is surprised by mail going to their customers.

Contracts

Open the contract and choose Send Email or Generate Link — a secure, time-limited signing link. The signer needs no account. When every required party has signed, the contract becomes executed, its content locks, and an audit certificate recording the signing is appended to the PDF.

Contracts

Yes. The signing page has a negotiation and feedback section, so a client can ask for a change rather than simply not signing and leaving you guessing.

Contracts

Before you send, it reads the draft and flags unusual or one-sided terms so you notice them while you can still change them. It is an extra reader, not a substitute for legal advice.

Contracts

Raise a change order. It goes draft, pending, approved — with approval as a separate permission from editing, so nobody approves their own amendment. On approval the amount flows into the contract's revised value and the job's cost exactly once, and progress billing bills against the revised value.

Forms

A blank form is built from scratch with the drag-and-drop palette. A Smart PDF Form starts from a PDF you already use — upload it and BOOTMARK detects its fields so the paper form your customers already recognise becomes fillable and reportable.

Forms

Open a form and choose Submissions to see each entry field by field, newest first, with a table view for scanning. Everything exports to CSV, and form workflows can notify people or fire a webhook the moment a submission arrives.

Inventory

Materials are the consumables crews use on jobs; products are what you sell. Both carry cost, price and stock with low-stock alerts. Materials recorded on a work order deduct from stock when the job is approved as complete, and a purchase order tops stock back up when it is received.

Inventory

Yes. Locations cover warehouses, yards and vehicles, and Stock Transfers move inventory between them, so van stock is a real number rather than a guess.

Reporting

Business Reports cover sales summary, work orders, client activity, inventory, revenue trends and service distribution. Analytics adds trends and forecasts. Job costing rolls material, labour and approved change orders into a per-job margin, and everything exports to CSV or Excel.

Reporting

The audit log records who did what and when, with before-and-after values on meaningful changes. Filter by user, record type and date to reconstruct a sequence of events.

Automation & AI

Automations are general when-this-then-that rules across operations, finance and clients. Job Workflows define the stages a work order moves through for a particular kind of job — so a roof replacement and a service call do not have to share the same three statuses.

Automation & AI

Answer questions about how BOOTMARK works, query your own workspace data within what your role may see, and draft records from a description — always showing you exactly what will be saved before anything is written.

Automation & AI

Yes. The AI Control Center has per-feature toggles and a kill switch that stops all AI immediately, enforced centrally rather than page by page. It also shows token spend per feature so you can see what AI is costing.

Connect

Connect is a public marketplace where customers search local providers by category and location, view profiles and request or book work. Bookings arrive in Connect Bookings and flow into your normal pipeline. Your listing needs a category before it can be published.

Connect

They are verified against completed bookings, so a rating reflects work that was actually done through the platform rather than anonymous opinion.

Connect

There is a structured dispute flow with escrow states, giving the customer and the provider a defined path and a record, instead of an argument over email.

Developers

Yes. Every core module — clients, work orders, estimates, invoices, contracts, scheduling, inventory and more — is available over a REST API at /api/v1/<your-workspace>/. Issue a scoped key from Settings, then Developers & API.

Developers

A key carries scopes like invoices:read or work-orders:write, and only the ticked scopes are reachable — anything else returns a clear insufficient-scope error. A key also only ever works against its own workspace, and endpoints outside the documented public API are not reachable with a key at all.

Developers

You issue a new one. BOOTMARK stores only a one-way hash of the key, so it genuinely cannot be shown again. Revoking a key stops it working on the very next request.

Developers

Each delivery carries a signature header of the form t=<timestamp>,v1=<hmac>. Compute HMAC-SHA256 of timestamp.rawBody using your endpoint's signing secret and compare. Reject anything older than five minutes so a captured request cannot be replayed later.

Developers

BOOTMARK retries up to four times with backoff. A 4xx (other than 429) is treated as a deliberate rejection and is not retried. After fifteen consecutive failures the endpoint is disabled and the reason is shown on the Webhooks tab, so we stop hammering a dead URL.

Developers

Yes — 300 requests per minute per key. Exceeding it returns a 429 with a retry hint rather than failing silently. Key traffic is metered per key rather than per IP, so a server-to-server integration is not throttled by sharing an address.

Account & plans

Open App Customization (owner or admin rights, or the customization permission, on the Business Suite plan). Upload your logo, set your brand colours and theme, and they apply across the app, the client portal and every generated PDF.

Account & plans

In Account Settings enter your SMTP host, port, username and an app-specific password from your mail provider, then send a test. Until you do, mail goes out from the platform default sender.

Account & plans

Free covers a small operation with limited monthly jobs, one crew member and basic analytics. Journal documents work — jobs, time, GPS, forms, contracts and inventory. Pro adds scheduling, employees, estimates, the lead pipeline, online booking and client messaging. Business Suite runs the whole company, adding invoicing, payments, the client portal, e-signatures, automations, advanced reporting, branding and AI.

Account & plans

You are warned as you approach it rather than cut off without notice. Each plan caps jobs, crew, clients, contracts and storage; upgrading raises them immediately, and a platform admin can raise one specific limit for one customer without changing the tier.

Account & plans

Yes. An owner or admin can export the workspace's data at any time. Secrets — passwords, keys, tokens — are redacted from the export by design.

Account & plans

Only if you turn them on. Automated work-order emails and the on-the-way notification are off by default and controlled in Dispatch Settings, so nobody accidentally mails their whole customer list on day one.